Now Reading: POCO F3 Battery Replacement Guide – Redmi K40 / Mi 11X / Mi 11i (BM4Y) DIY Repair
-
01
POCO F3 Battery Replacement Guide – Redmi K40 / Mi 11X / Mi 11i (BM4Y) DIY Repair

POCO F3 Battery Replacement Guide – Redmi K40 / Mi 11X / Mi 11i (BM4Y) DIY Repair
Hi everyone, welcome back to Geardo.
In this guide, we’ll walk you through how to replace the battery on the Poco F3, also known as the Xiaomi 11X and Redmi K40.
If your phone is draining quickly, overheating, or shutting down unexpectedly, a battery replacement can bring it back to life. This step-by-step guide is written especially for beginners, so you can confidently perform the repair at home.
Repair Overview
- Device Type: Smartphone
- Repair Type: Battery Replacement
- Estimated Time: 30–45 minutes
Repair Difficulty
★★★☆☆ (Moderate)
Reasons for Battery Replacement
- Battery drains too fast
- Phone shuts down randomly
- Device overheats during use
- Battery swelling or bulging back cover
- Slow charging or not charging properly
Before You Begin
Compatibility and Model Numbers
- Redmi K40 Series ( Redmi K40 / K40 Pro / K40 Pro Plus)
- Xiaomi 11x / 11i Series
- Poco F3 Series
Model Numbers : M2012K11AG, M2012K11AC, M2012K11C, M2012K11AI, M2012K11I
This guide is based on the Redmi K40, which shares identical design with the Poco F3 and Xiaomi Mi 11X / Xiaomi Mi 11i. These are rebranded regional models, but always watch for minor internal differences during the repair.
Tools Required
- Mobile phone heating pad or hairdryer/heat gun
- Plastic pry tool / card pry
- Suction cups
- Phillips #00/#000 screwdrivers
- Torx (T2/T3/T4) screwdrivers
- Flathead screwdriver
- Tweezers (for connectors)
- B7000 glue or double-sided adhesive (for back cover)
- Rubber bands or bonding clips to secure the back cover
How to Find Tools and Parts
- Heating pad – https://amzn.to/3H0tHzJ
- Portable Heat Gun – https://amzn.to/4mszih1
- Clamps https://amzn.to/3GYJT4w
- STREBITO 142 Piece Repair Tool Kit https://amzn.to/3UO1jUx
- Glue | Adhesive https://amzn.to/46exVxe
- Compatible Parts –
- Battery – https://amzn.to/4t0Aw6W
- Screen – https://amzn.to/48hkKfR
- Other Parts – https://amzn.to/4cF5E69
- Silicone Work Repair Mat https://amzn.to/45Emz5l
✅ Protect Your Phone
- Best Premium Case https://amzn.to/4cF5E69
- Screen Protector https://amzn.to/423YP86
Step-by-Step Repair Guide
Step 1: Power Off & Remove SIM Tray
Turn off the phone completely. Remove the SIM tray using a SIM ejector tool.
Step 2: Remove the Back Cover
Heat the edges of the back cover gently to soften the adhesive.
- Use a heating pad (recommended) and select the mobile heating option
- Alternatively, use a heat gun or hairdryer
Once heated:
- Use a suction cup to lift slightly
- Insert a plastic pry tool or card
- Carefully cut through the adhesive around the edges
Remove the back cover slowly.
Step 3: Remove the Board Frame
- Unscrew 11 screws securing the frame
- Disconnect the flash connector
- Lift and remove the board frame
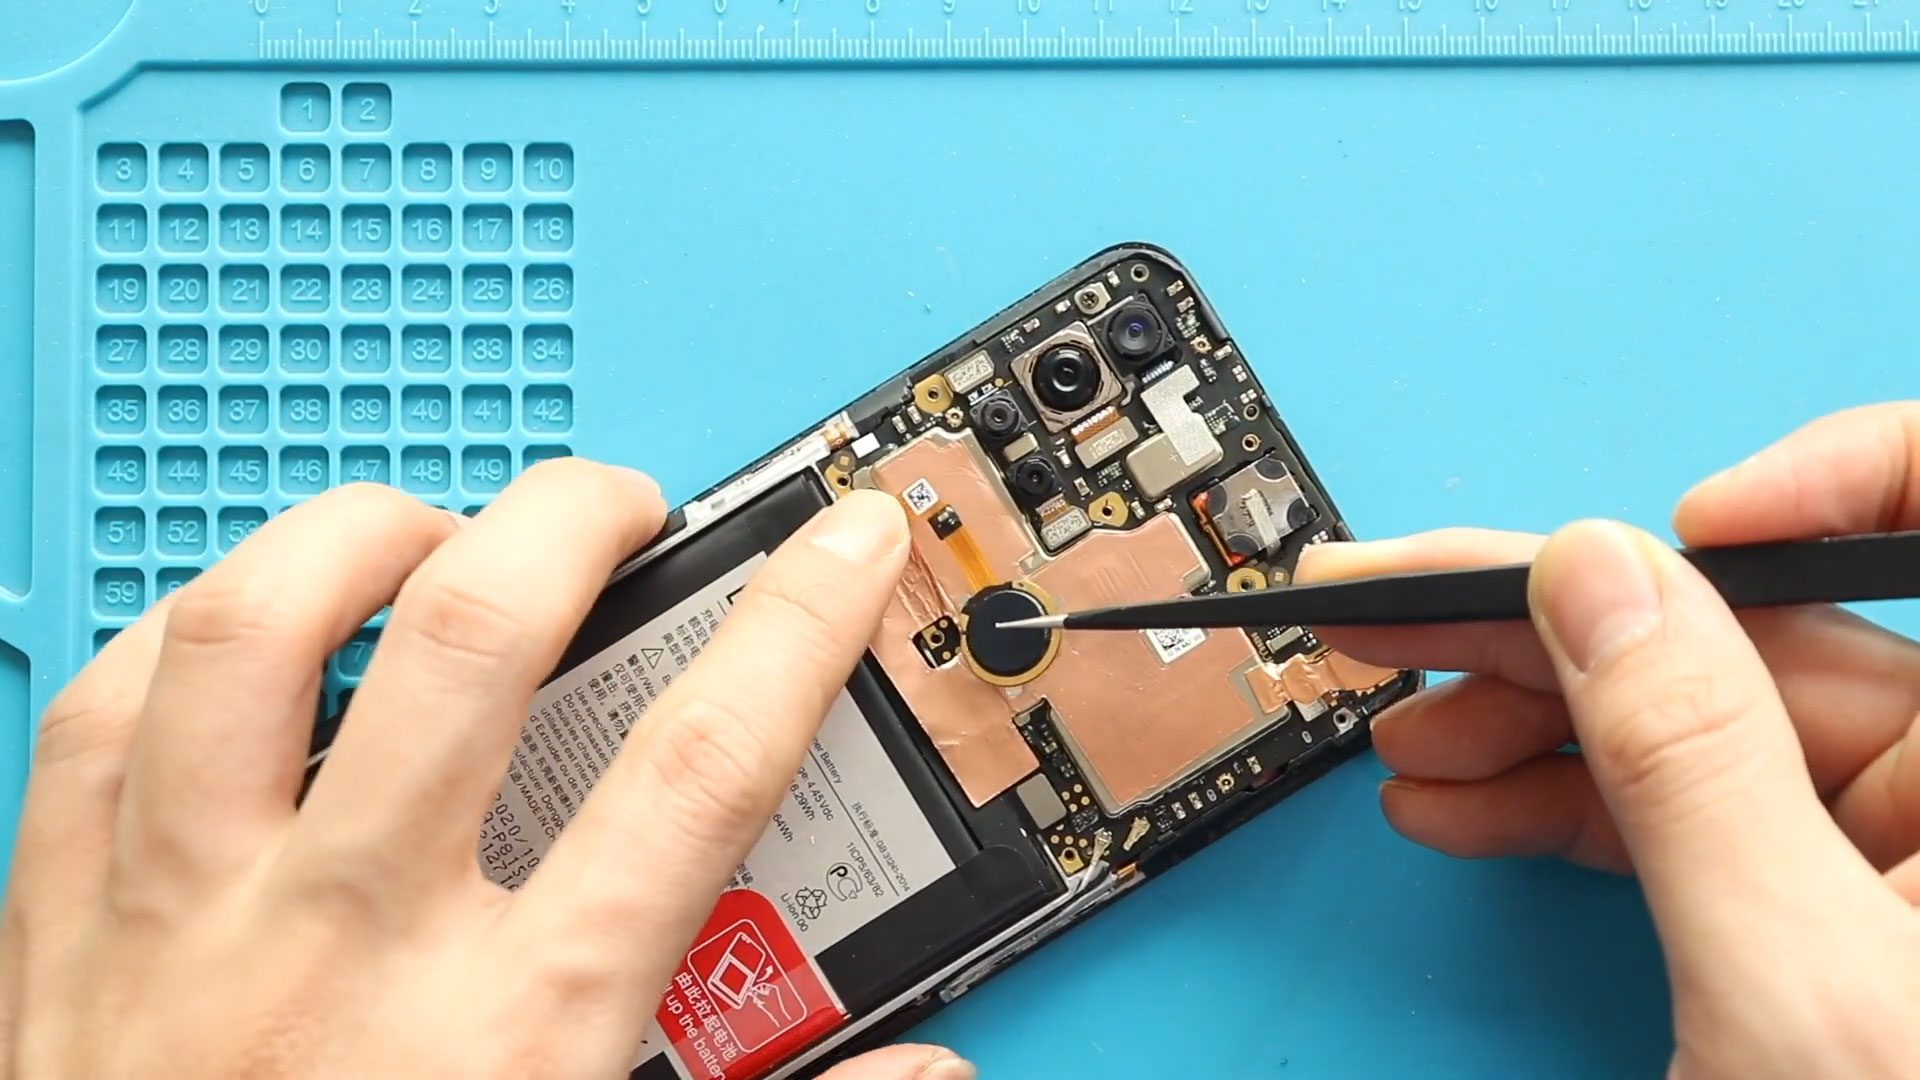
Step 4: Disconnect Internal Components
- Unplug the battery connector (right side)
- Disconnect the main ribbon cable from the board
Step 5: Remove the Battery
- Gently loosen the adhesive strips on the sides
- Pull the adhesive tabs slowly
- Carefully lift and remove the battery
⚠️ Be gentle—do not bend or puncture the battery.
Step 6: Install the New Battery
- Place the new battery into position
- Secure it with adhesive
Step 7: Reconnect Components
- Reconnect the main ribbon cable
- Reconnect sensor and battery connectors
Step 8: Reassemble the Phone
- Reinstall the board frame and tighten all 11 screws
Before closing:
- Ensure there is enough adhesive on the back cover
- Apply B7000 glue or new adhesive if needed
Step 9: Seal the Back Cover
- Press the back cover firmly into place
- Use clips or rubber bands to hold it tightly
- Leave it for some time to ensure proper bonding
FAQs
Q1: How do I know if my battery needs replacement?
If your phone drains quickly, overheats, or shuts down unexpectedly, the battery is likely worn out.
Q2: Is it safe to replace the battery myself?
Yes, if you follow the steps carefully and use proper tools. Avoid damaging internal components.
Q3: Will replacing the battery improve performance?
Yes, especially if your current battery is degraded. You may notice better battery life and stability.
Q4: Do I need to fully discharge the battery before replacing it?
No, but it’s safer to keep the battery below 25% charge to reduce risk.
Q5: Can I reuse the old adhesive?
It’s not recommended. Always use fresh adhesive or glue for proper sealing.
Troubleshooting (After The Repair)
Q1: Phone not turning on after replacement
- Check battery connector properly
- Ensure ribbon cables are secured
- Try charging for 10–15 minutes
Q2: Back cover not sticking properly
- Apply new adhesive or B7000 glue
- Use clips or rubber bands for better bonding
Q3: Battery draining fast after replacement
- Calibrate battery (charge to 100%, then discharge to 0%)
- Check for background apps draining power
Q4: Phone overheating
- Ensure battery is properly installed
- Check connectors and remove any debris
Q5: Screen or components not working
Make sure nothing is loose or misaligned
Recheck all connectors
Related Guides
View More POCO F3 / Redmi K40 / Xiaomi 11x Series Repair Guides