
Now Reading: iPad 9 (10.2-inch, 2021) LCD Display Touch Screen Replacement Guide
-
01
iPad 9 (10.2-inch, 2021) LCD Display Touch Screen Replacement Guide
iPad 9 (10.2-inch, 2021) LCD Display Touch Screen Replacement Guide
Hi everyone, welcome back to DIYGeardo.
In this guide, we’ll show you how to replace the LCD display and touch screen digitizer glass on the Apple iPad 9th Generation (10.2-inch, 2021). If your iPad has a cracked glass, unresponsive touch, display lines, black screen, or flickering LCD, replacing the screen assembly is the correct fix.
The iPad 9 (2021) uses a non-laminated LCD and digitizer, meaning the glass and display are separate components. While this makes the repair more affordable, it still requires proper heating, careful cable handling, and patience to avoid damaging the flex cables or Touch ID.
Before starting, make sure you have the correct replacement parts and repair tools, which you can find in the description. This guide is suitable for DIY repairers and technicians, and we’ll walk you through each step in detail.
Repair Overview
- Device: Apple iPad 9 (10.2-inch, 2021)
- Repair Type: LCD & Touch Screen Digitizer Replacement
- Estimated Time: 60–90 minutes
- Repair Difficulty: ★★★★☆ (Moderate to Advanced)
⚠️ This repair involves fragile flex cables and the Touch ID button. Extra care is required during disassembly and reassembly.
Before You Begin
Required Tools
- Heating pad / heat gun / hairdryer
- Suction cup
- Plastic card pry tools / opening picks/ Tweezers
- Phillips screwdriver #00 / #000
- Adhesive (B7000 or double-sided back cover adhesive)
- Bonding clips or rubber bands (optional but recommended)
Make sure the phone is turned off and the SIM tray is removed (For Cellular Version)before starting.
How to Find Tools and Parts
- Heating pad – https://amzn.to/3H0tHzJ
- Portable Heat Gun – https://amzn.to/4mszih1
- Clamps https://amzn.to/3GYJT4w
- STREBITO 142 Piece Repair Tool Kit https://amzn.to/3UO1jUx
- Glue | Adhesive https://amzn.to/46exVxe
- Compatible Parts –
- Battery – https://amzn.to/4m8zrqi
- Touch Screen – https://amzn.to/3IXxiiC
- LCD Screen – https://amzn.to/40WixTg
- Other Parts – https://amzn.to/41lzman
- Silicone Work Repair Mat https://amzn.to/45Emz5l
Step-by-Step LCD & Digitizer Replacement Guide
Step 1: Heat the Front Screen
Proper heating is required to separate the screen from the body.
- Use a tablet heating pad and heat the front side of the iPad.
- Select the tablet heating option and wait until heating completes.
- Alternatively, use a heat gun or hair dryer on low heat.
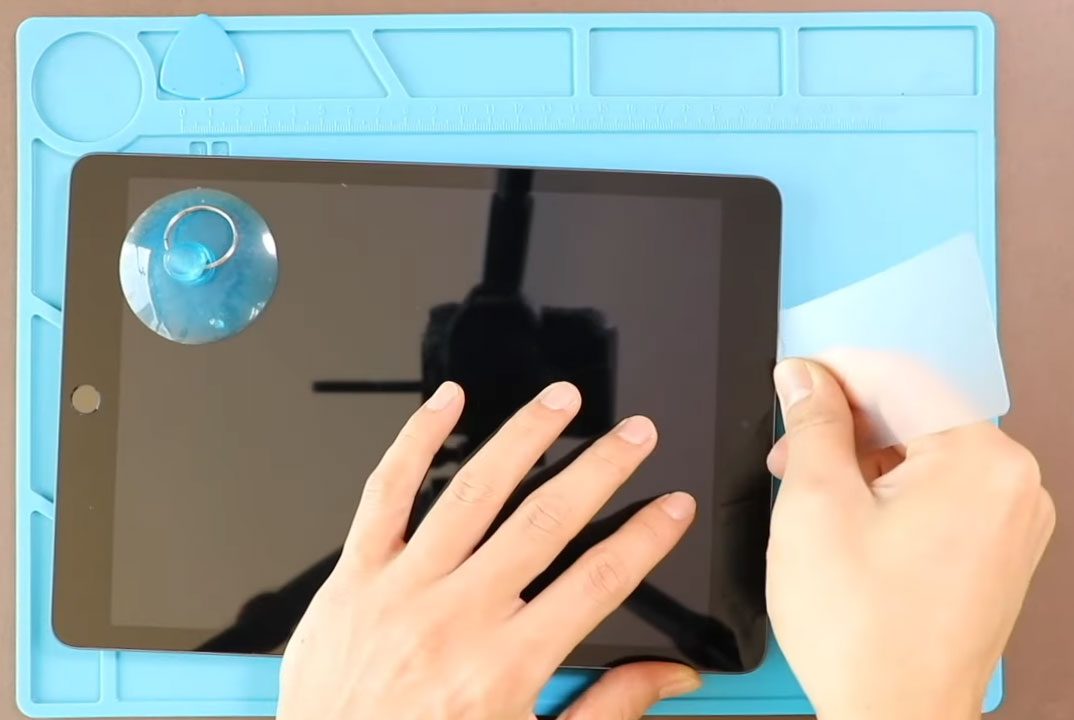
Step 2: Create an Opening Gap
- Attach a suction cup to the side of the screen and gently lift.
- Insert a plastic card or triangle picker.
- Carefully cut the adhesive around the edges.
⚠️ Be gentle—flex cables are attached to the logic board.
Step 3: Open the Touch Screen
- Open the touchscreen like opening a book, from left to right.
- Keep it open carefully until the LCD screen is removed.
Step 4: Remove the LCD Screen
- Remove the sticky tapes covering the screw heads.
- Undo four screws securing the LCD.
- Lift the LCD to a 90-degree angle from the top.
- Undo three screws, remove the shield, and disconnect the LCD connector.
- Remove the LCD screen from the body.
Step 5: Disconnect Touch Screen & Touch ID
- Unplug both touchscreen connectors from the socket.
- Peel back the tape and lift the locking tab.
- Disconnect the Touch ID flex cable.
Now the touchscreen assembly can be removed from the body.
Step 6: Digitizer Replacement Options (Important)
If your touch screen glass is broken, there are two replacement options available:
- Touch Screen Digitizer Assembly
- Comes with Home button & flex pre-installed
- Easier and faster installation
- Touch Screen Digitizer Only
- Does not include Home button & flex
- Requires transferring parts from the old screen
Step 7: Transfer Home Button & Flex (If Required)
If using a digitizer without Home button & flex:
- Apply light heat to soften the adhesive around the home button.
- Gently push the button from the front side.
- Carefully peel the flex cable using a pry tool.
- Remove the home button and flex assembly.
- Install it onto the new digitizer and secure it properly.
⚠️ Be extremely careful—damaging this flex will disable Touch ID permanently.
Step 8: Install the New Touch Screen
- Connect both touchscreen connectors.
- Connect the Home button flex.
- Position the digitizer temporarily for testing.
Step 9: Install the New LCD Screen
- Connect the LCD connector.
- Install the metal shield and secure it with screws.
- Place the LCD into position.
- Insert and tighten four LCD screws.
Step 10: Seal the Display
- Ensure enough adhesive is applied around the frame.
- Use B7000 glue or pre-cut adhesive strips.
- Close the digitizer like closing a book:
- Bottom first
- Then top
- Press sides evenly
Verify that the Home button sits correctly and clicks properly.
Use screen bonding clips or rubber bands and leave them in place for some time.
Repair Complete
We hope you’ve enjoyed the iPad 9 (2021) LCD & touch screen digitizer replacement guide.
If you have any questions, feel free to leave a comment.
Please like, share, and comment on our videos — and don’t forget to hit the subscribe button.
FAQs
1. Is the iPad 9 (2021) display laminated?
No. The iPad 9 uses a non-laminated display, meaning the LCD and digitizer are separate components.
2. Can I replace only the touch screen glass without changing the LCD?
Yes, if the LCD is working properly. You can replace only the digitizer, but transferring the Home button flex is required.
3. Will Touch ID work after screen replacement?
Yes, only if the original Home button and flex cable are reused. Replacing the Home button will permanently disable Touch ID.
4. Are iPad 8 and iPad 9 screens interchangeable?
Some parts may look similar, but compatibility is not guaranteed. Always confirm the exact model before replacement.
5. Do I need to replace adhesive after the repair?
Yes. New adhesive is required to properly secure the digitizer and prevent dust entry or screen lifting.
6. Should I test the display before sealing the screen?
Absolutely. Always connect and test the LCD and touch screen before applying adhesive and closing the iPad.
Troubleshooting – After The Repair
1. Touch screen is not responding after repair
Check both digitizer connectors and ensure the locking tabs are fully secured.
2. LCD shows no display or flickers
The LCD connector may be loose, misaligned, or not fully seated under the shield.
3. Touch ID not working
The Home button flex may be damaged, improperly connected, or pinched during installation.
4. Screen lifts or separates after reassembly
This usually indicates insufficient adhesive or uneven pressure during bonding.
5. Home button does not click properly
The digitizer may not be seated correctly. Reopen and realign the Home button area.


-
 01Samsung Galaxy A16 5G Battery Replacement | Full DIY Repair Guide
 -
02Samsung Galaxy A16 5G Screen Replacement | Step-by-Step Guide
-
03Google Pixel 6 Power Button Replacement Guide | Volume Button Flex Repair Guide- DIY Repair
-
04Samsung Galaxy A16 5G Back Cover & Camera Lens Frame Replacement Guide | DIY Repair
-
05Why a Heating Pad Is Essential for Mobile Phone Repairs (And How to Use it)
-
06How to Use a Heat Gun or Hair Dryer for Phone/Tablet Repairs
-
07Essential Repair Tools for Phone, Tablet & Laptop Repairs


