
Now Reading: OnePlus 8 Main Motherboard Flex Cable Replacement Guide | DIY Repair
-
01
OnePlus 8 Main Motherboard Flex Cable Replacement Guide | DIY Repair
OnePlus 8 Main Motherboard Flex Cable Replacement Guide | DIY Repair
If your OnePlus 8 is experiencing issues like unresponsive buttons, charging problems, or intermittent connectivity, the problem may be caused by a faulty main flex cable. Replacing the main flex restores full functionality to your device. This guide provides a detailed, step-by-step approach to safely replace the main flex cable at home.
Repair Overview
- Device Type: Android Smartphone
- Model: OnePlus 8
- Type of Repair: Main Flex Cable Replacement
Repair Difficulty : ★★★★★☆☆☆☆☆ (5/10 – Moderate)
Estimated Time: 50–65 minutes
Reasons for Main Flex Replacement
- Unresponsive power or volume buttons
- Charging issues or device not recognizing charger
- Intermittent connectivity between components
- Physical or water damage affecting internal connections
- Device fails to boot or shows inconsistent behavior
Before You Begin
Compatibility and Model Numbers
Oneplus 8
This repair guide based on OnePlus 8
Model Numbers | IN2013, IN2017, IN2010, IN2019, IN2011
Tools Required
- Mobile phone heating pad or hairdryer/heat gun
- Plastic pry tool / card pry
- Suction cups
- Phillips #00/#000 screwdrivers
- Torx T3 / T4 Screwdriver
- Flathead Screwdriver
- Tweezers (for connectors)
- B7000 glue or double-sided adhesive (for back cover)
- Rubber bands or bonding clips to secure the back cover
Using proper tools reduces the risk of damaging the phone.
How to Find Tools and Parts
- Heating pad – https://amzn.to/3H0tHzJ
- Portable Heat Gun – https://amzn.to/4mszih1
- Clamps https://amzn.to/3GYJT4w
- STREBITO 142 Piece Repair Tool Kit https://amzn.to/3UO1jUx
- Glue | Adhesive https://amzn.to/46exVxe
- Compatible Parts –
- Battery – https://amzn.to/3IgZ75c
- Screen – https://amzn.to/46iYhNy
- Other Parts – https://amzn.to/47Hh2N3
- Silicone Work Repair Mat https://amzn.to/45Emz5l
✅ Protect Your Oneplus 8
Best Rated Cases https://amzn.to/3KSEFZF
Top Screen Protection https://amzn.to/4o0cypQ
Step-by-Step Main Flex Replacement Guide
Opening the Device
Power off your OnePlus 8 completely. Heat the edges of the back cover gently using a heating pad, heat gun, or hair dryer to soften the adhesive. Use a suction cup and plastic card to carefully lift the back cover and cut the adhesive around the frame.
Step 1. Removing the Logic Board Frame
Unscrew and remove the logic board frame to access internal components. Keep track of all screws for reassembly.
Step 2. Removing the Battery
Disconnect and remove the battery carefully to prevent short circuits during the repair.
Step 3. Removing the Secondary Board Cover
Unscrew and remove the secondary board cover to access the main flex cable.
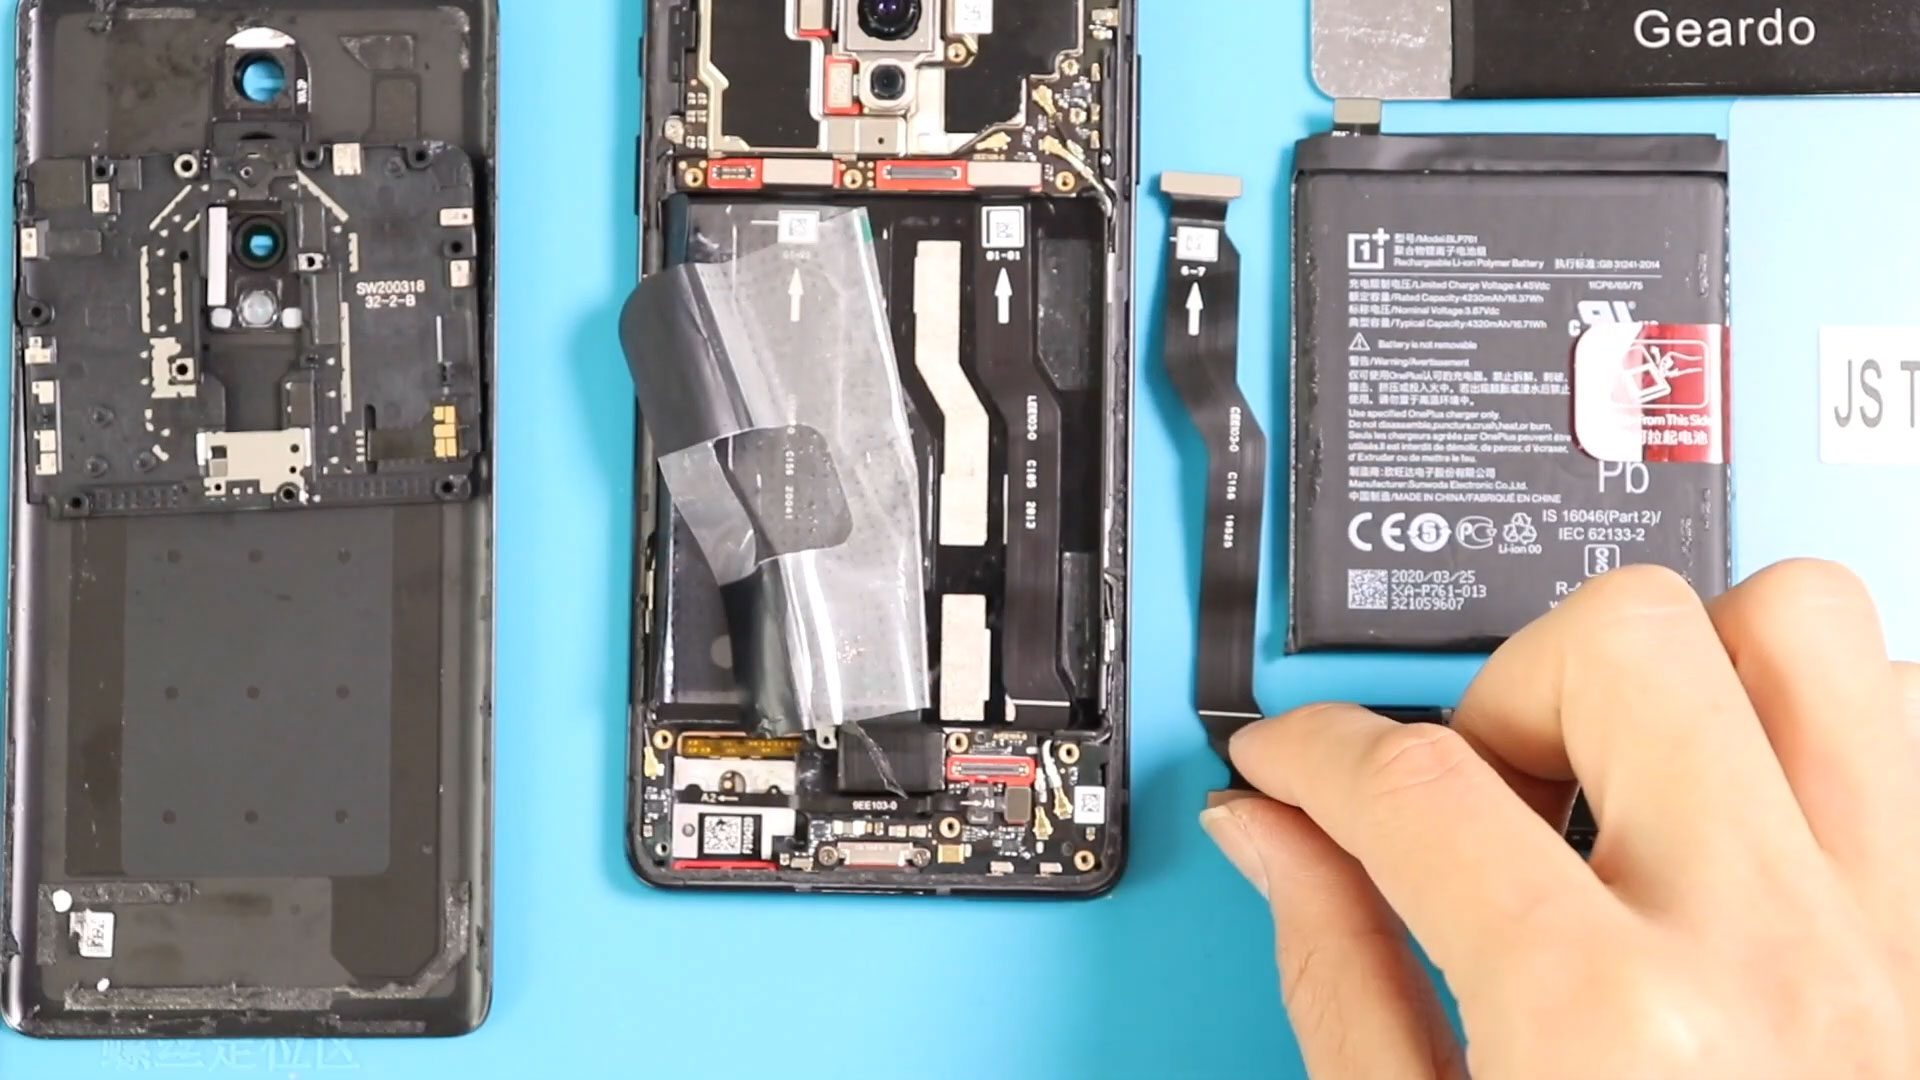
Step 4. Removing the Faulty Main Flex Cable
Locate the faulty main flex cable and disconnect it from the logic board and secondary board. Remove it carefully without damaging surrounding components.
Step 5. Installing the New Main Flex Cable
Place the new main flex cable in the original position. Reconnect it securely to the logic board and secondary board, ensuring all connectors are properly seated.
Step 6. Reassembling the Device
Reinstall the secondary board cover and secure it with screws. Place the battery back into its compartment and reconnect it. Reattach the logic board frame and tighten all screws.
Step 7. Closing the Device
Check that the back cover has enough adhesive. Apply B7000 glue or double-sided adhesive if necessary. Align the back cover carefully, press firmly, and use binding clips or leave the device flat until the adhesive sets completely.
Frequently Asked Questions (FAQ)
Q1: Can I replace the main flex cable myself?
Yes, this is a moderate-level repair that can be done at home with the right tools and patience.
Q2: How do I know if the main flex is faulty?
Symptoms include unresponsive buttons, charging issues, or intermittent component connectivity.
Q3: Will this repair affect other components?
No, as long as you handle the logic board, battery, and secondary board carefully.
Q4: What adhesive should I use for the back cover?
B7000 glue or pre-cut double-sided adhesive is recommended for a secure seal.
Troubleshooting After Replacement
Q1: Device still has unresponsive buttons?
- Ensure the main flex cable is properly seated and all connectors are fully attached.
Q2: Device not charging properly?
- Confirm that the main flex cable is correctly aligned with the charging port.
Q3: Back cover not adhering well?
- Apply extra adhesive and use binding clips or rubber bands to secure the cover while it sets.
Q4: Device powering off unexpectedly?
- Double-check that the battery connector and all flex connectors are properly reattached.
Replacing the main motherboard flex on the OnePlus 8 is a moderate-level repair that can restore overall connectivity and internal functionality. With patience, proper tools, and careful handling, you can complete this repair successfully at home.
If you found this guide helpful, feel free to explore more repair tutorials to keep your devices running like new.
Related Guides


