
Now Reading: Samsung Galaxy A04 Charging Port Replacement Guide (A04e | M04 | F04 | A04s)
-
01
Samsung Galaxy A04 Charging Port Replacement Guide (A04e | M04 | F04 | A04s)
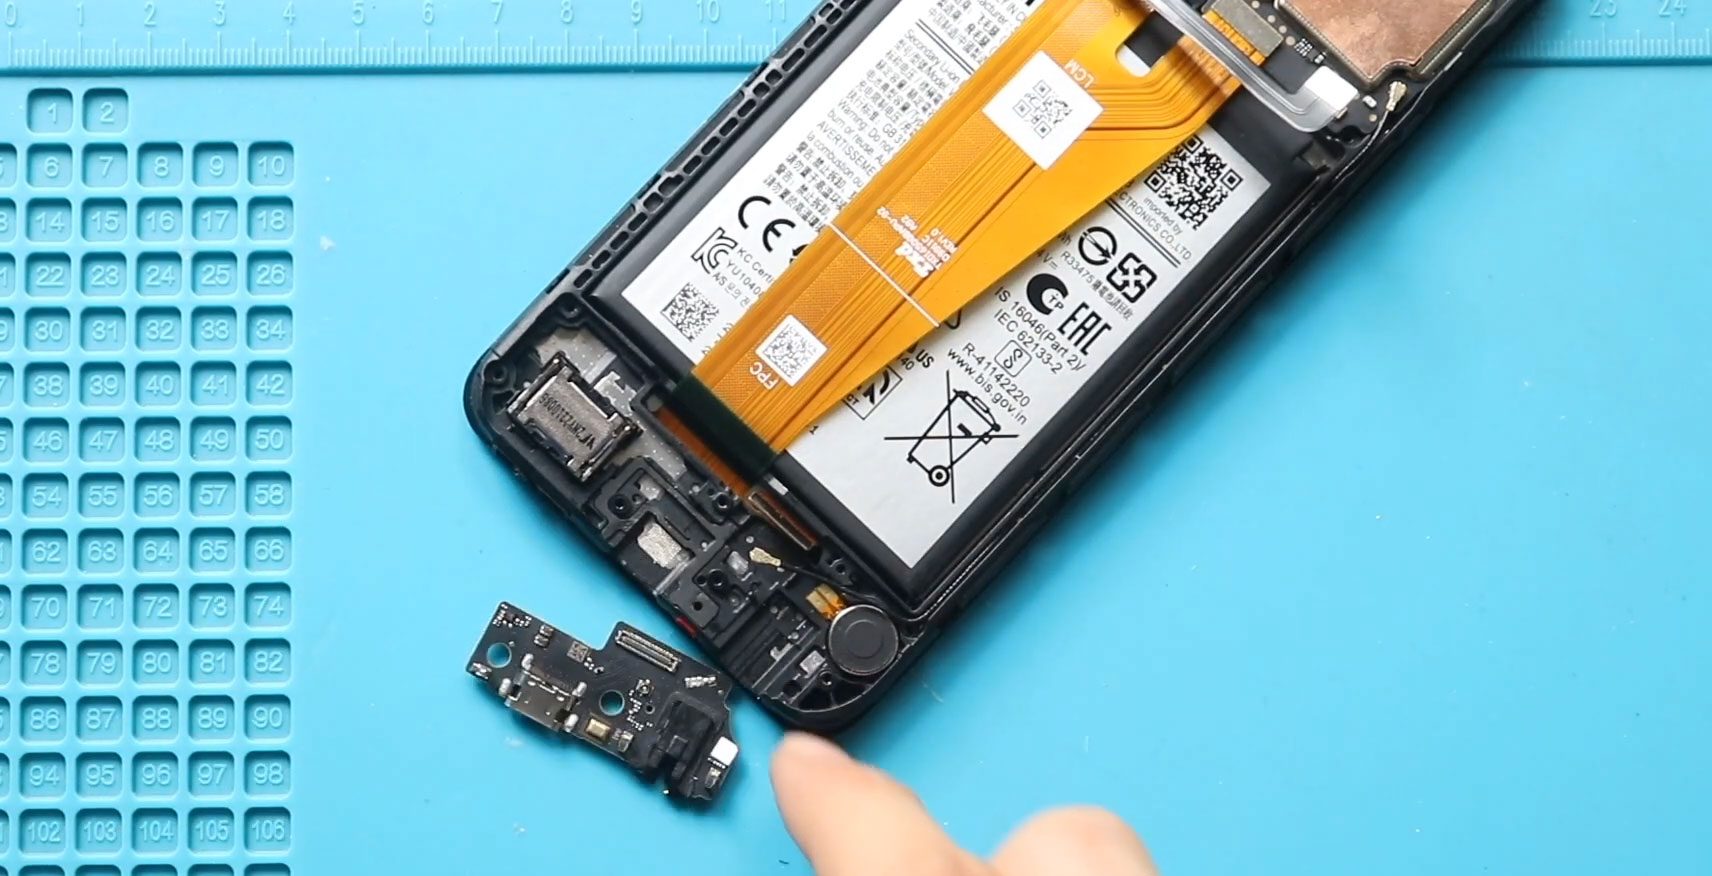
Samsung Galaxy A04 Charging Port Replacement Guide (A04e | M04 | F04 | A04s)
If your Samsung Galaxy A04 is not charging properly, microphone stops working during calls, or the headphone jack produces no sound, the charging port sub-board may be damaged. The charging port board contains several important components including the USB charging connector, microphone circuitry, and headphone jack connections.
In this detailed repair guide, we will show you how to safely replace the charging port and headphone checkboard on the Samsung Galaxy A04 using proper tools and repair techniques. This repair helps restore stable charging performance, audio functionality, and data connection reliability.
Carefully follow each step to avoid damaging delicate connectors and ribbon cables inside the device.
Protect Your Galaxy A04 Series
- Best Rated Case https://amzn.to/4l7QBVh
- Protect the Screen https://amzn.to/4r0E9bd
==== Latest Samsung Super Budget Phones – https://amzn.to/4rGpR0E ===
Reasons for Samsung Galaxy A04 Charging Port Replacement
You may need this repair if you notice:
- Phone not charging or charging intermittently
- Loose or damaged USB charging connector
- Microphone not working during calls or recordings
- Headphones not detected or audio issues
- Charging cable disconnecting easily
- Dust, corrosion, or liquid damage inside the port
Repair Difficulty ⭐⭐⭐☆☆ (Moderate)
- Device Type: Smartphone
- Device Model: Samsung Galaxy A04
- Repair Type: Charging Port / Microphone / Headphone Jack Replacement
- Estimated Repair Time: 20 — 35 Minutes
This repair involves removing internal covers and disconnecting connectors. Gentle handling is required to avoid damaging the motherboard and LCD ribbon cable.
Before You Begin
Compatibility and Model Numbers
- Samsung Galaxy A04
- Samsung Galaxy M04*
- Samsung Galaxy F04*
- Samsung Galaxy A04e*
- Samsung Galaxy A04s*
This repair guide based on Samsung Galaxy A04 Model.
*Please note that there are some internal changes. Make sure to pay close attention during the repair.
Model Numbers | SM-A045F, SM-A045F/DS, SM-A045M, SM-A047F, SM-A047F/DS, SM-A047F/DSN, SM-A047M, SM-A042F, SM-A042F/DS, SM-A042M, SM-A042M/DS, SM-E045F, SM-E045F/DS, SM-M045F, SM-M045F/DS
Tools Required
- Mobile phone heating pad or hairdryer/heat gun
- Plastic pry tool / card pry
- Suction cups
- Phillips #00/#000 screwdrivers
- Flat Screwdriver (Handy For Connectors)
- Tweezers (for connectors)
- B7000 glue or double-sided adhesive (for back cover)
- Rubber bands or bonding clips to secure the back cover
Using proper tools reduces the risk of damaging the phone.
How to Find Tools and Parts
- Heating pad – https://amzn.to/3H0tHzJ
- Portable Heat Gun – https://amzn.to/4mszih1
- Clamps https://amzn.to/3GYJT4w
- STREBITO 142 Piece Repair Tool Kit https://amzn.to/3UO1jUx
- Glue | Adhesive https://amzn.to/46exVxe
- Compatible Parts (Galaxy A04) –
- Battery – https://amzn.to/3N66FKA
- Screen – https://amzn.to/3OMAekQ
- Other Parts – https://amzn.to/4r0DQgz
- Compatible Parts (Galaxy A04s) –
- Battery – https://amzn.to/3MIOVF3
- Screen – https://amzn.to/4u3ecus
- Other Parts – https://amzn.to/46wTeKd
- Silicone Work Repair Mat https://amzn.to/45Emz5l
Samsung Galaxy A04 Charging Port Board Replacement — Step-by-Step Guide
Step 1 — Power Off and Remove SIM Tray
Completely power off the phone before starting.
Remove the SIM tray using a SIM ejector tool.
Step 2 — Remove the Back Cover
Create a small opening near the SIM slot or charging port using a plastic pick or card pry tool.
Insert the pry tool between the frame and back cover.
Carefully slide around the edges to release the plastic clips securing the cover.
Gently lift and remove the back cover from the body.
Step 3 — Remove Board Protection Bracket
Locate the motherboard protection bracket.
Remove the ten Phillips screws securing the bracket.
Carefully lift and remove the bracket.
Step 4 — Disconnect Battery Connector
Disconnect the battery plug using a plastic pry tool.
Disconnecting power prevents short circuits during repair.
Step 5 — Remove Speaker Cover
Remove the seven screws securing the bottom speaker cover.
Lift and remove the speaker assembly carefully.
Step 6 — Disconnect LCD Connector
Disconnect the LCD connector plug from the motherboard carefully.
Avoid bending or pulling the cable.
Step 7 — Remove Charging Port Board
Carefully lift and remove the charging port, microphone, and headphone jack sub-board from the device body.
Remove gently to avoid damaging antenna or flex cables.
Step 8 — Install New Charging Port Board
Place the replacement charging port board into position.
Make sure the board sits correctly inside the alignment guides.
Step 9 — Reconnect LCD Connector
Reconnect the LCD ribbon cable securely to the motherboard.
Ensure proper alignment before pressing the connector.
Step 10 — Reinstall Speaker Cover
Place the speaker cover back into position.
Secure it using the seven screws removed earlier.
Step 11 — Reconnect Battery Connector
Reconnect the battery plug securely.
Step 12 — Reinstall Board Bracket
Place the motherboard bracket back into position.
Secure it using the ten screws.
Step 13 — Reassemble the Phone
Align the back cover carefully.
Press firmly around the edges until all clips snap into place.
Reinsert the SIM tray.
Power on the phone and test charging, microphone, and headphone functionality.
Frequently Asked Questions (FAQ)
Q1. Does replacing the charging port fix microphone problems?
Yes. The microphone is integrated into the charging port board on many models, so replacing it often restores microphone functionality.
Q2. Why disconnect the battery first?
Disconnecting the battery prevents short circuits and protects sensitive components during repair.
Q3. Can charging problems be caused by dirt instead?
Yes. Always clean the charging port first before replacing the board.
Q4. Is heating required for this repair?
No heating is normally required since the charging port board is screw mounted.
Q5. Will this repair fix headphone jack issues?
Yes. Since the headphone jack connection is part of the same sub-board, replacing it can restore audio output problems.
Troubleshooting After Repair
Q1. Phone not charging after replacement?
Check whether the charging port flex cable is seated correctly and reconnect the battery.
Q2. No sound through headphones?
Make sure the board is fully aligned and no dust entered the jack during installation.
Q3. Screen not turning on?
Reconnect the LCD connector carefully.
Q4. Microphone still not working?
Check for motherboard connector damage or test another replacement board.
Q5. Back cover not closing properly?
Make sure cables are not trapped and screws are fully tightened.
Related Guides


-
 01Samsung Galaxy A16 5G Battery Replacement | Full DIY Repair Guide
 -
02Samsung Galaxy A16 5G Screen Replacement | Step-by-Step Guide
-
03Google Pixel 6 Power Button Replacement Guide | Volume Button Flex Repair Guide- DIY Repair
-
04Samsung Galaxy A16 5G Back Cover & Camera Lens Frame Replacement Guide | DIY Repair
-
05Why a Heating Pad Is Essential for Mobile Phone Repairs (And How to Use it)
-
06How to Use a Heat Gun or Hair Dryer for Phone/Tablet Repairs
-
07Essential Repair Tools for Phone, Tablet & Laptop Repairs


