
Now Reading: Samsung Galaxy A16 5G Antenna Replacement Guide | DIY Repair
-
01
Samsung Galaxy A16 5G Antenna Replacement Guide | DIY Repair
In this repair guide, we’ll show you how to replace the antenna signal connector cable on your Samsung Galaxy A16 5G.
Follow the steps carefully and use the proper tools for a safe and successful repair.
Compatibility and Model Numbers
This repair guide based on Samsung Galaxy A16 5G mobile phone, but it is also compatible with Galaxy A16 4g model too.
Compatible Mode Numbers l SM-A166B, SM-A166B/DS, SM-A166P, SM-A166P/DS, SM-A166E, SM-A166E/DS, SM-A166W, SM-A166U, SM-A166U1, SM-A165F, SM-A165F/DS, SM-A165M, SM-A165M/DS, SM-A165F/DSB
Before You Begin
- Power off the phone
- Remove the SIM tray
- Work on a clean surface
Step 1 — Prepare Your Tools
You will need proper tools to open the device. All the required tools are listed in the description below.
Before You Begin
Required Tools
- Heating pad / heat gun / hairdryer
- Suction cup
- Plastic card pry tools / opening picks
- Phillips PH00 screwdriver
- Adhesive (B7000 or double-sided back cover adhesive)
- Bonding clips or rubber bands (optional but recommended)
How to Find Tools and Parts
- Heating pad – https://amzn.to/3H0tHzJ
- Portable Heat Gun – https://amzn.to/4mszih1
- Clamps https://amzn.to/3GYJT4w
- STREBITO 142 Piece Repair Tool Kit https://amzn.to/3UO1jUx
- Glue | Adhesive https://amzn.to/46exVxe
- Compatible Parts https://amzn.to/4pOwJIM
- Silicone Work Repair Mat https://amzn.to/45Emz5l
How to Select the Best Tools for the Repair
Step-by-Step Repair
1. Remove the Back Cover
- Heat the edges of the back cover to soften the adhesive.
- Use a heating pad (Mobile Phone Heating option)
- Or a heat gun / hairdryer
- Do not overheat
- Use a suction cup at the bottom area to create a small gap.
- Insert a plastic pry tool and slide around the edges to loosen the adhesive.
- Take your time
- Keep the tool shallow to avoid internal damage
- Once the adhesive is free, gently lift and remove the back cover.

2. Open the Mid-frame
- Make sure the SIM tray is removed.
- Remove all 15 mid-frame screws.
- Disconnect the fingerprint/power button connector.
- Use a plastic pry tool to separate the mid-frame.
- Work around the edges
- Release all plastic clips slowly
- Disconnect the battery connector.

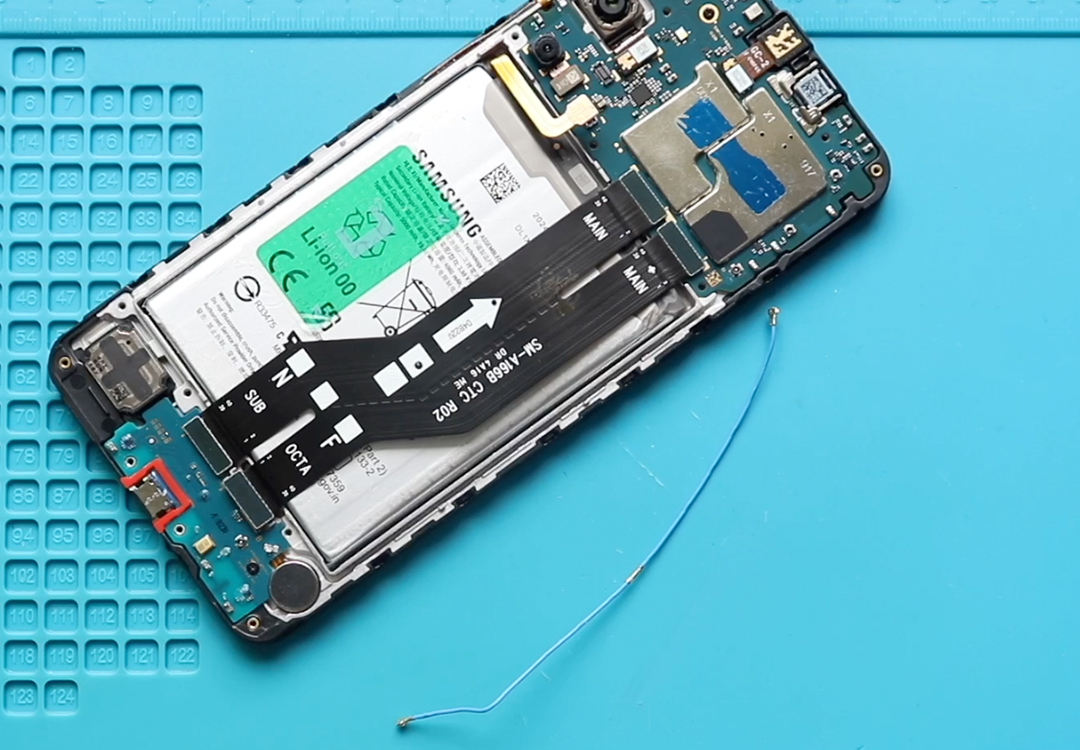
3. Remove the Faulty Antenna Cable
- Disconnect the antenna heads from both:
- The logic board
- The charging port board
- Gently lift and pull the antenna cable through the frame path.
4. Install the New Antenna
- Place the new antenna cable properly along the frame path.
- Connect both ends:
- Logic board side
- Charging port board side
Ensure both antenna heads snap in cleanly.
If Your Galaxy A16 Battery is Draining fast, here is the Solution
5. Reassemble the Phone
- Reconnect the battery plug.
- Place the mid-frame back and align all clips.
- Tighten all 15 screws.
- Secure the fingerprint/power button connector.
- Insert the SIM tray.
6. Seal the Back Cover
Check if the adhesive is still strong.
If not, apply B7000 glue or fresh double-sided back cover adhesive.
Press the cover firmly and use:
- Bonding clips
- Or rubber bands (even pressure)
Let it sit for proper bonding.
Repair Completed
Your Samsung Galaxy A16 5G antenna replacement is complete.
If you need help or have questions, feel free to ask!
Frequently Asked Questions
1. What are the signs of a faulty antenna cable?
- Weak network signal
- No signal in certain areas
- Slow mobile data
- Drops in Wi-Fi or mobile connection
2. Can I replace the antenna without removing the battery?
Yes — you only need to disconnect the battery, not remove it.
3. Will replacing the antenna delete my data?
No. This repair does not affect internal storage.
4. Can I use glue instead of original adhesive?
Yes — B7000 glue works well, or you can use a premade adhesive sticker.


