
Now Reading: Samsung Galaxy A17 5G Loudspeaker Replacement Guide | Fix Sound Issues
-
01
Samsung Galaxy A17 5G Loudspeaker Replacement Guide | Fix Sound Issues
Samsung Galaxy A17 5G Loudspeaker Replacement Guide | Fix Sound Issues
If your Samsung Galaxy A17 5G produces weak sound, distorted audio, crackling noises, or no sound at all from the bottom loudspeaker, replacing the loudspeaker module may restore normal audio performance.
The loudspeaker is responsible for media playback, speakerphone calls, notifications, alarms, and ringtone output. Over time, dust, liquid exposure, accidental drops, or normal wear can cause speaker failure.
In this repair tutorial, we’ll guide you through removing the damaged loudspeaker assembly and installing a replacement part. The repair requires opening the device, removing the mid-frame, and accessing the speaker module located at the bottom of the phone.
Repair Difficulty
Difficulty: ⭐⭐☆☆☆ (Easy to Moderate)
Estimated Time: 25–40 Minutes
Repair Type: Loudspeaker Replacement
Reasons for the Repair
A speaker replacement may be necessary if you notice:
- No ringtone sound.
- Very low speaker volume.
- Distorted or crackling audio.
- Speakerphone calls are difficult to hear.
- Notification sounds are missing.
- Media playback sounds muffled.
- Water or dust damage affecting the loudspeaker.
- Physical damage from drops or impacts.
Before You Begin
Compatibility and Model Numbers
This repair guide based on Samsung Galaxy AA17 5G Model. Also Compatible with Galaxy A17 4G version, M17 & F17.
Model Numbers | SM-A176B , SM-A176B/DS, SM-A176U, SM-A176U1, SM-A175F, SM-A175F/DS, SM-A175M, SM-A175M/DS, SM-A175F/DSB, SM-M176B, SM-M176B/DS, SM-E176B/DS
Tools Required
- Mobile phone heating pad or hairdryer/heat gun
- Plastic pry tool / card pry
- Suction cups
- Phillips #00/#000 screwdrivers
- Tweezers (for connectors)
- B7000 glue or double-sided adhesive (for back cover)
- Rubber bands or bonding clips to secure the back cover
How to Find Tools and Parts
- Heat Mat / Heating Pad – https://amzn.to/3H0tHzJ
- Best Portable Heat Gun – https://amzn.to/4cZYnhL
- Clamps – https://amzn.to/3GYJT4w
- STREBITO 142 Piece Repair Tool Kit – https://amzn.to/3UO1jUx
- Stronger Suction Cup – https://amzn.to/3UVb6YR
- Silicone Work Repair Mat – https://amzn.to/4euW6fs
- Must Have Glue | Adhesive – https://amzn.to/4uxhKog
- Compatible Parts –
- Battery – https://amzn.to/4u43ZwP
- Screen – https://amzn.to/4cGsXNf
- Other Parts – https://amzn.to/3P2eiCP
| Premium Electric Screwdriver Kit Fanttik 50 in 1 Mini Precision Electric Kit – https://amzn.to/49azZaT Recommended Fanttik Electric Repair Workstation – https://amzn.to/42X2Ifz |
How to Replace the Loudspeaker in Samsung Galaxy A17 5G
Step 1: Prepare the Device
Completely power off the phone.
Remove the SIM card tray and place it aside for reassembly.
Step 2: Soften the Rear Cover Adhesive
Warm the edges of the rear cover to loosen the factory adhesive.
A heating pad provides even heat, but a hair dryer or heat gun can also be used.
Move the heat source continuously around the perimeter and avoid concentrating heat in one area.
Step 3: Separate the Back Cover
Create a small opening using a suction cup near the bottom edge.
Insert a plastic opening card and carefully work around the perimeter.
Continue cutting through the adhesive until the back cover can be safely removed.
Step 4: Disconnect the Fingerprint Flex Cable
Locate the fingerprint sensor connector and disconnect it before continuing.
This prevents strain on the cable during disassembly.
Step 5: Remove the Mid-Frame Assembly
Unscrew all fifteen Phillips screws securing the mid-frame.
Use a plastic opening tool to release the retaining clips around the edges.
Once all clips are released, lift the mid-frame away from the device.
Step 6: Disconnect Battery Power
Locate the battery connector on the motherboard.
Disconnect the battery before servicing any internal components.
This reduces the risk of accidental electrical damage.
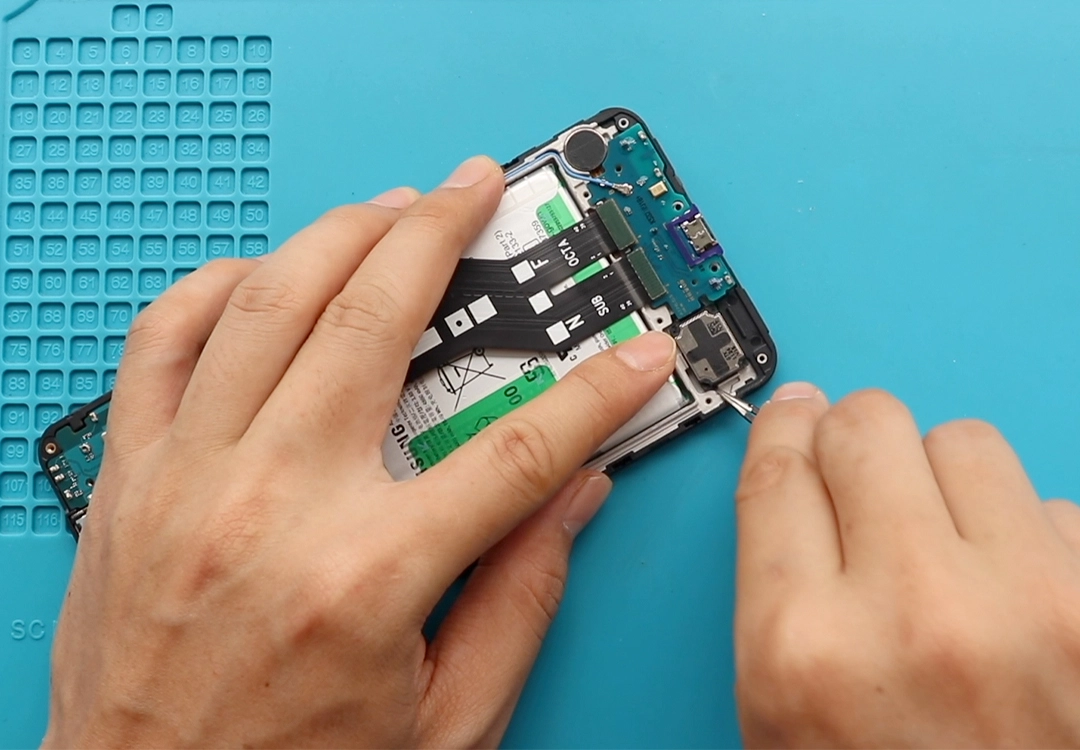
Step 7: Access the Loudspeaker Module
Locate the loudspeaker assembly positioned near the bottom section of the phone.
Remove the screw securing the speaker support board.
Carefully lift the board to release the loudspeaker flex connection underneath.
Step 8: Remove the Damaged Speaker
If necessary, apply mild heat to soften any adhesive securing the loudspeaker.
Carefully lift the speaker module from the frame.
Inspect the speaker cavity and remove any dust or debris before installation.
Step 9: Install the New Loudspeaker
Position the replacement loudspeaker in the correct location.
Ensure it sits flush within the housing and aligns properly with the speaker contacts.
Reinstall the support board and secure it using the retaining screw.
Step 10: Restore Power and Reassemble
Reconnect the battery connector.
Position the mid-frame onto the device and reconnect the fingerprint sensor.
Press around the perimeter until all clips engage.
Reinstall the fifteen screws and insert the SIM tray.
Step 11: Test Audio Functions
Before sealing the phone, power it on and test:
- Ringtones
- Media playback
- Speakerphone audio
- Notification sounds
- Alarm volume
Confirm the replacement speaker operates correctly.
Step 12: Reattach the Rear Cover
Apply replacement adhesive if necessary.
Align the rear cover and press it firmly into position.
Use bonding clips or rubber bands to maintain pressure while the adhesive cures.
Allow sufficient curing time before regular use.
Frequently Asked Questions (FAQ)
Q: What does the loudspeaker do in the Samsung Galaxy A17 5G?
A: The loudspeaker produces ringtone, alarm, notification, media, and speakerphone audio.
Q: Why is my phone speaker crackling?
A: Speaker damage, moisture, dust buildup, or physical impact can cause distorted audio output.
Q: Can dust make the speaker quieter?
A: Yes. Dirt and debris can partially block the speaker outlet and reduce sound quality.
Q: Is the loudspeaker connected to the charging board?
A: No. The loudspeaker is a separate component, although it sits near the charging port assembly.
Q: Will replacing the speaker improve volume?
A: If the original speaker is damaged or worn, a replacement can restore normal sound levels.
Troubleshooting
Q: There is still no sound after replacing the speaker.
A: Verify the speaker contacts align properly and confirm the battery connector is fully connected.
Q: Audio sounds distorted after installation.
A: Check for debris inside the speaker cavity and ensure the speaker sits correctly within the frame.
Q: Speakerphone volume is still low.
A: Test with multiple applications and verify system volume settings before reopening the device.
Q: The phone will not power on after reassembly.
A: Recheck the battery connection and inspect all connectors that were disconnected during the repair.
Q: The back cover does not stay attached.
A: Apply fresh adhesive and use bonding clips until the adhesive cures completely.
Conclusion
Replacing the Samsung Galaxy A17 5G loudspeaker is an effective solution for low volume, distorted audio, and speaker-related sound issues. By carefully following the steps above and testing the replacement before sealing the device, you can restore clear and reliable audio performance.
Related


-
 01Samsung Galaxy A16 5G Battery Replacement | Full DIY Repair Guide
 -
02Samsung Galaxy A16 5G Screen Replacement | Step-by-Step Guide
-
03Google Pixel 6 Power Button Replacement Guide | Volume Button Flex Repair Guide- DIY Repair
-
04Samsung Galaxy A16 5G Back Cover & Camera Lens Frame Replacement Guide | DIY Repair
-
05Why a Heating Pad Is Essential for Mobile Phone Repairs (And How to Use it)
-
06How to Use a Heat Gun or Hair Dryer for Phone/Tablet Repairs
-
07Essential Repair Tools for Phone, Tablet & Laptop Repairs


