Now Reading: Samsung Galaxy A32 5G Volume Flex Replacement Guide | Earpiece and Vibrator (M32 5G)
-
01
Samsung Galaxy A32 5G Volume Flex Replacement Guide | Earpiece and Vibrator (M32 5G)
Samsung Galaxy A32 5G Volume Flex Replacement Guide | Earpiece and Vibrator (M32 5G)
If your Samsung Galaxy A32 5G is experiencing issues with the earpiece, vibrator motor, or volume button functionality, it’s likely due to worn-out or damaged components. These small internal parts are critical for calls, notifications, and user control. Replacing them can restore proper function without replacing the whole device.
This guide provides a detailed, step-by-step walkthrough for replacing the earpiece, vibrator, and volume flex, including proper disassembly, reassembly, and testing tips.
Repair Difficulty
⭐⭐⭐☆☆ (3/5 – Moderate)
Estimated Time: 30–45 minutes
Type of Device: Android Smartphone
Type of Repair: Internal Component Replacement – Earpiece, Vibrator, Volume Flex
Reasons for Replacement
- No sound during calls
- Vibrator not functioning for notifications
- Volume buttons not responsive
- Device has been dropped or exposed to liquid
- Physical damage or wear of internal flex cables
Replacing these components is cost-effective and restores full device functionality.
Before You Begin
Compatibility and Model Numbers
- Samsung Galaxy A32 5G
- Samsung Galaxy M32 5G
- Samsung Galaxy A32 – The Design is slightly different
This repair guide based on Samsung Galaxy A42 5G Model.
Model Numbers | SM-A326B, SM-A326B/DS, SM-A326BR/DS, SM-A326BR, SM-A326U, SM-A326W, SM-A326U1, SM-A326K, SCG08, SM-S326DL, SM-M326B, SM-M326B/DS
Tools Required
- Mobile phone heating pad or hairdryer/heat gun
- Plastic pry tool / card pry
- Suction cups
- Phillips #00/#000 screwdrivers
- Tweezers (for connectors)
- B7000 glue or double-sided adhesive (for back cover)
- Rubber bands or bonding clips to secure the back cover
Using proper tools reduces the risk of damaging the phone.
How to Find Tools and Parts
- Heating pad – https://amzn.to/3H0tHzJ
- Portable Heat Gun – https://amzn.to/4mszih1
- Clamps https://amzn.to/3GYJT4w
- STREBITO 142 Piece Repair Tool Kit https://amzn.to/3UO1jUx
- Glue | Adhesive https://amzn.to/46exVxe
- Compatible Parts –
- Battery – https://amzn.to/46batzW
- Screen – https://amzn.to/46b3uGY
- Other Parts – https://amzn.to/486qUjo
- Silicone Work Repair Mat https://amzn.to/45Emz5l
Protect Your Galaxy A32 5G
- Best Rated Case https://amzn.to/4glZPek
- Protector For The Screen https://amzn.to/4nEKdFh
Step-by-Step Replacement Guide
Step 1: Power Off the Device
Before starting, turn off your Galaxy A32 5G completely to prevent short circuits.
Step 2: Remove the Back Cover
The back cover is secured with adhesive. Heat it gently using a heating pad, heat gun, or hairdryer until the adhesive softens. Use a suction cup to create a small opening and slide a plastic card or pry tool around the edges to detach the back cover.
Step 3: Remove the Midframe
- Remove the SIM tray.
- Unscrew the 15 screws securing the midframe.
- Disconnect the fingerprint sensor plug.
- Use a plastic pry tool to gently release the clips and remove the midframe.
Step 4: Remove the Logic Board
- Disconnect the battery connector and main flex ribbon.
- Carefully lift the logic board from the frame while detaching antennas as needed.
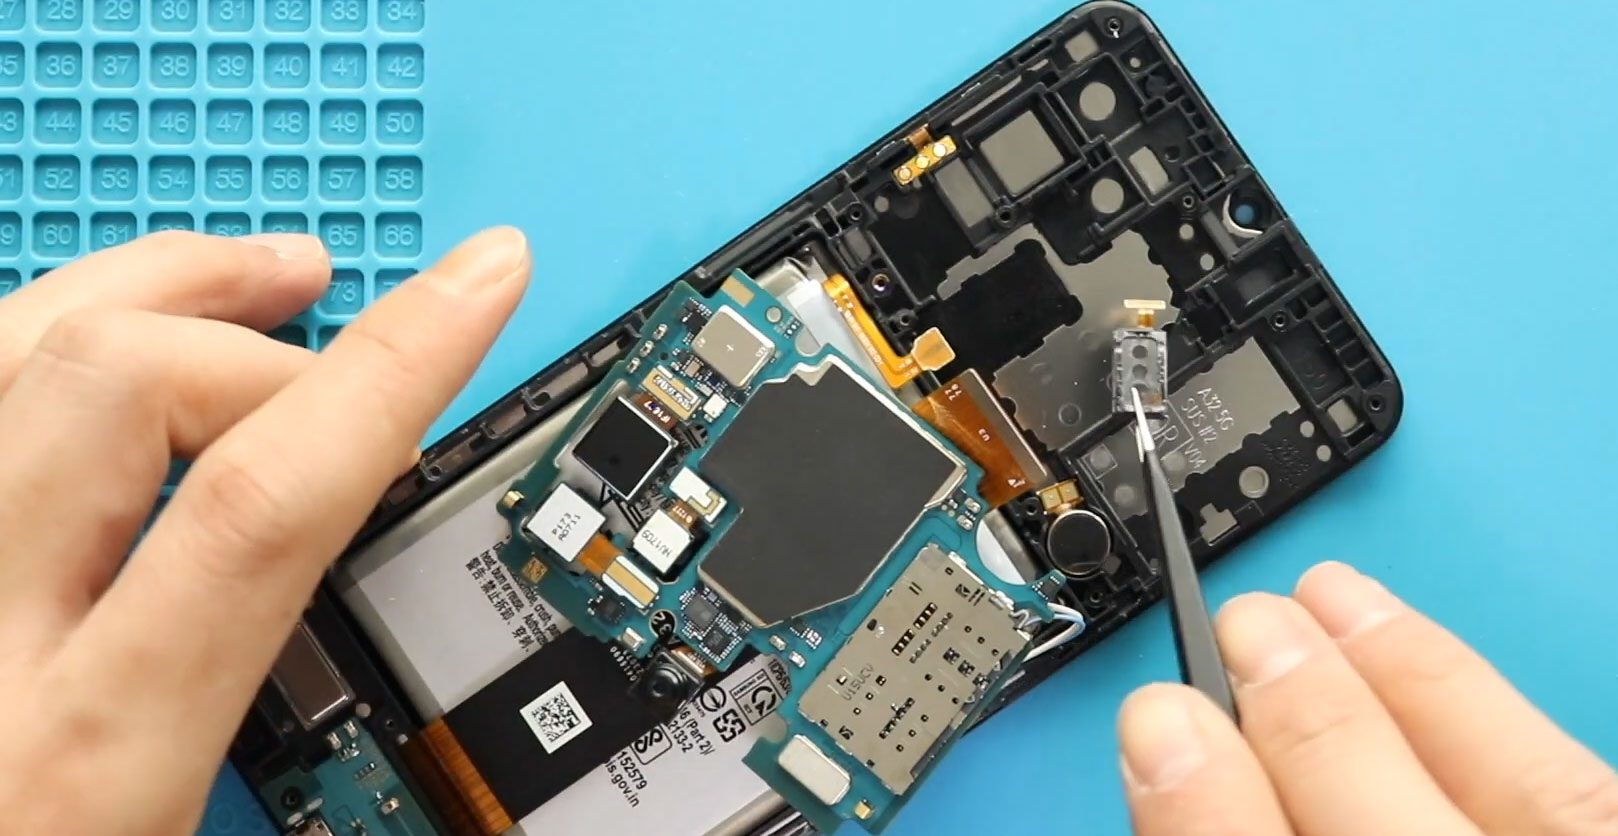
Step 5: Remove and Replace the Earpiece Module
- Gently remove the non-working earpiece module.
- Install the new earpiece in the correct position and ensure it is secured.
Step 6: Remove and Replace the Vibrator Motor
- Carefully remove the existing vibrator motor from the body.
- Install the new vibrator motor in the original position.
Step 7: Remove and Replace the Volume Flex
- Detach the faulty volume flex cable.
- Place the new volume flex, ensuring all connectors align correctly.
Step 8: Reinstall the Logic Board
Position the logic board back into the frame and reconnect all flex and antenna connections securely.
Step 9: Reassemble the Midframe
- Place the midframe back in position.
- Secure all 15 screws.
- Reconnect the fingerprint sensor plug.
Step 10: Test Functionality Before Closing
Power on the device and verify:
- Earpiece audio during calls
- Vibrator notifications
- Volume buttons functionality
This ensures all replaced components are working correctly.
Step 11: Seal the Back Cover
- Apply new adhesive if needed (B7000 glue or double-sided tape).
- Press the back cover firmly into place.
- Use bonding clips or rubber bands for 30–60 minutes to secure adhesion.
Frequently Asked Questions (FAQ)
Q1: Why is my earpiece not working?
The earpiece may be damaged, obstructed, or disconnected internally. Replacement restores full audio functionality.
Q2: Will replacing the vibrator affect other components?
No, the vibrator replacement only affects notification and haptic feedback. Ensure connectors are properly seated.
Q3: Why aren’t my volume buttons responding?
This is typically caused by a faulty volume flex cable or misaligned connectors. Replacement solves this issue.
Q4: Does this repair erase my data?
No, replacing the earpiece, vibrator, or volume flex does not affect personal data.
Troubleshooting
Device Not Responding After Reassembly
Causes: Loose connectors or screws, misaligned components.
Solution: Recheck all connections, ensure the logic board and flex cables are properly seated.
Back Cover Not Sticking
Causes: Insufficient adhesive or uneven placement.
Solution: Apply fresh glue or double-sided tape and use bonding clips or rubber bands.
Volume Buttons Still Unresponsive
Causes: Damaged new flex cable or misalignment.
Solution: Verify correct installation, ensure connectors are fully engaged.
Related