Now Reading: Samsung Galaxy S20 Plus 5G Charging Port Replacement | Step-by-step Guide
-
01
Samsung Galaxy S20 Plus 5G Charging Port Replacement | Step-by-step Guide

Samsung Galaxy S20 Plus 5G Charging Port Replacement | Step-by-step Guide
Hi everyone, welcome back to GEARDO.
Today we will show you how to replace the charging port on the Samsung Galaxy S20 Plus mobile phone. If your phone is not charging properly, connecting intermittently, or the port is physically damaged, replacing the charging port can solve these issues.
Please note the main microphone is located in the charging port board.
Before starting, make sure you have the right tools to proceed with the repair. You can find the full tools list in the description.
Compatibility and Model Numbers
This repair guide based on Samsung Galaxy S20 Plus (S20+) 5G mobile phone, but it is also compatible with Galaxy S20 Plus 4g version too.
Compatible Mode Numbers l SM-G986, SM-G986F, SM-G986F/DS, SM-G986U, SM-G986U1, SM-G9860, SM-G986B/DS, SM-G986N, SM-G986B, SM-G986W, SM-G985, SM-G985F, SM-G985F/DS
Tools You Need
- Heating pad / heat gun / hairdryer
- Suction cup
- Plastic card pry tools / opening picks
- Phillips PH000 screwdriver
- Philips PH00 screwdriver – For smaller internal screws (optional)
- Adhesive (B7000 or double-sided back cover adhesive)
- Bonding clips or rubber bands (optional but recommended)
How to Find Tools and Parts
- Heating pad – https://amzn.to/3H0tHzJ
- Portable Heat Gun – https://amzn.to/4mszih1
- Clamps https://amzn.to/3GYJT4w
- STREBITO 142 Piece Repair Tool Kit https://amzn.to/3UO1jUx
- Glue | Adhesive https://amzn.to/46exVxe
- Compatible Parts https://amzn.to/47VYx7t
- Silicone Work Repair Mat https://amzn.to/45Emz5l
How to Select the Best Tools for the Repair
Step-by-Step Charging Port Replacement Process
Step 1 – Remove SIM Tray
First, take out the SIM tray using a SIM ejector tool.
Step 2 – Heat the Back Cover
Gently heat around the edges of the back cover until the adhesive becomes soft.
We are using a heating pad. Place the phone with the back cover side down on the heating pad and select the Mobile Phone Heating option.
Alternatively, you can use a heat gun or hairdryer.
Step 3 – Open the Back Cover
After heating, use a suction cup to create a small gap between the frame and rear cover.
Insert a plastic card pry tool and slowly cut through the adhesive around the back cover. Carefully lift and remove the back cover.

Step 4 – Remove Wireless Charging Pad & Disconnect Battery
Disconnect the wireless charging pad connector and gently lift it out.
Then disconnect the battery connector to ensure safety while working on internal components.
Step 5 – Remove Speaker Cover
At the bottom of the phone, remove the speaker cover by unscrewing five screws using a Phillips screwdriver.
Change Cracked Camera Lens Glass in This Step
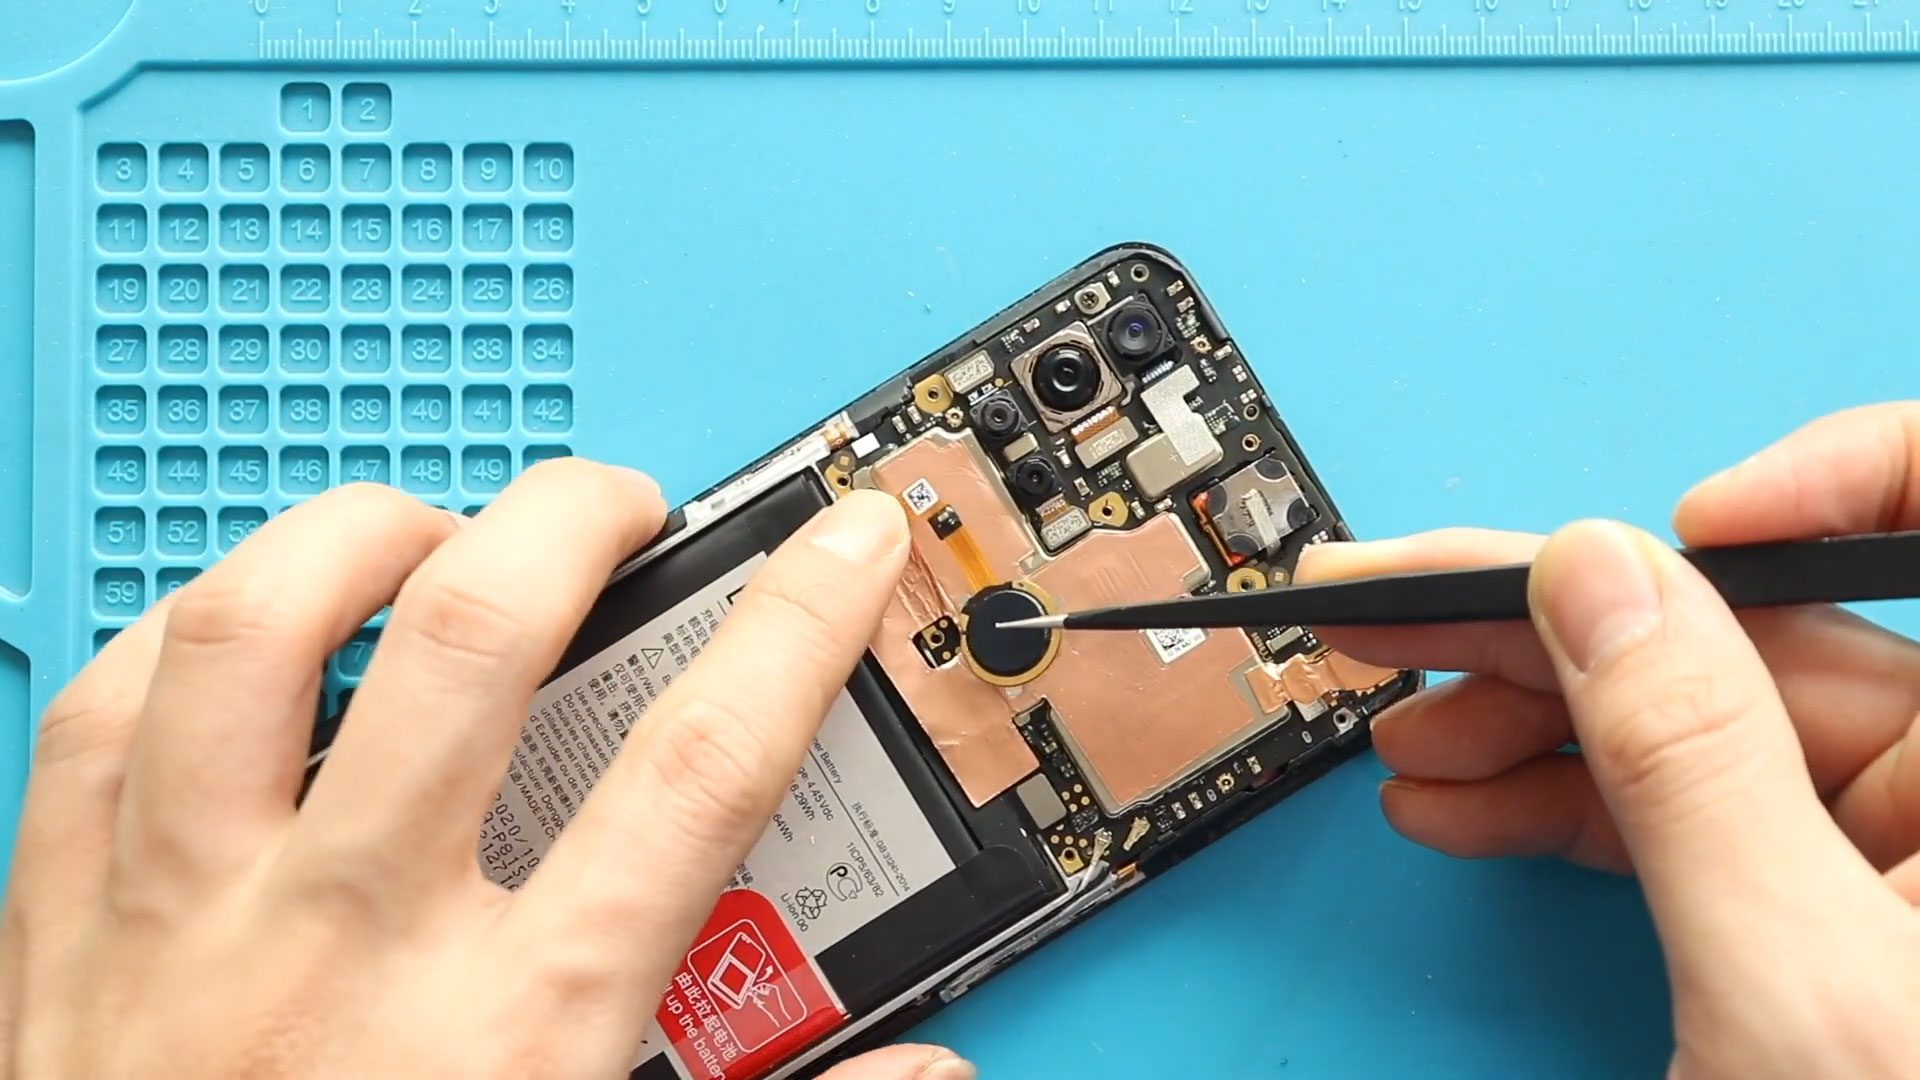
Step 6 – Disconnect Ribbon Flex Cables
Disconnect the two main ribbon flex cables connected to the secondary board to access the charging port board.
Step 7 – Remove the Broken Charging Port Board
Unscrew three screws securing the charging port board.
Use a plastic pry tool or tweezers to lift out the broken charging port board carefully.
Step 8 – Install the New Charging Port Board
Place the new charging port board into position.
Secure it with three screws and reconnect the two ribbon flex cables.

Step 9 – Reinstall the Speaker Cover
Place the speaker cover back and secure it using the five screws removed earlier.
Step 10 – Reconnect Wireless Pad, Battery, and SIM Tray
Reconnect the wireless charging pad and the battery connector.
Insert the SIM tray back into the phone.
Step 11 – Seal the Back Cover
Before closing the phone, make sure the back cover has enough adhesive.
If the old glue is weak, apply B7000 glue or use new double-sided back cover adhesive.
Press the back cover firmly into place.
Step 12 – Tighten the Back Cover
We are using screen binding clips to hold the back cover tightly.
Alternatively, you can use rubber bands and leave them for some time to ensure proper adhesion.
Final Words
I hope you enjoyed this Samsung Galaxy S20 Plus charging port replacement guide.
If you have any questions, feel free to comment on our post.
Don’t forget to like, share, and subscribe for more DIY repair guides.
Frequently Asked Questions
Q1: Can the charging port be replaced without removing the battery?
No, it is not recommended. Disconnecting the battery is essential for safety and to prevent short circuits during the repair.
Q2: What is included in the Samsung Galaxy S20 Plus charging port board?
The charging port board includes the USB-C charging port, microphone, and related circuitry. Replacing this board fixes both charging and microphone issues.
Q3: How do I know if my charging port board is faulty?
Common signs include:
- Phone not charging or charging intermittently
- USB-C cable not detected
- Microphone not working during calls or recordings
- Device only charges in certain positions or angles
Q4: Can water damage affect the charging port board?
Yes, water or moisture can corrode the charging port and the attached microphone. In such cases, replacing the board is usually the only fix.
Q6: What precautions should I take while heating the back cover?
- Heat evenly around the edges to prevent cracking the glass
- Avoid overheating, which can damage internal components
- Use heat-resistant tools while prying the cover
Q7: How do I avoid damaging ribbon flex cables?
- Always disconnect them carefully using a plastic pry tool
- Never pull on the cables directly
- Take note of the connector orientation before removal
Q8: How long does this repair usually take?
For someone experienced, it takes around 30–45 minutes. Beginners may take 60–75 minutes including careful heating, disconnecting cables, and reassembly.
Q9: Can a replacement charging port board be reused if it is removed from another phone?
It is not recommended. Used boards may have wear or hidden damage, which can cause charging or microphone issues. Always use a brand new replacement board.
Q10: Do I need to recalibrate the microphone after replacement?
No recalibration is required. Once the new charging port board is installed and connected, the microphone should work immediately.
Q11: Will replacing the charging port board affect wireless charging?
No, as long as the wireless charging pad is properly reinstalled and connected after the repair, wireless charging will function normally.
Visit our site to view other repair guides for the Galaxy S20 Plus 5G Series.