Now Reading: Samsung Galaxy S20 FE 5G Camera Replacement | DIY Repair Steps
-
01
Samsung Galaxy S20 FE 5G Camera Replacement | DIY Repair Steps

Samsung Galaxy S20 FE 5G Camera Replacement | DIY Repair Steps
Hi everyone, welcome back to GEARDO.
Today, we will show you how to replace the rear and front cameras on the Samsung Galaxy S20 FE mobile phone.
You can also use this guide to replace the Logic Board on the Samsung Galaxy S20 FE Series phones.
Before starting, make sure you have the correct tools for this repair. You can find the full tool list in the description.
Compatibility and Model Numbers
This repair guide based on Samsung Galaxy S20 FE 5G mobile phone, but it is also compatible with Galaxy S20 FE 4g & S20 FE 2022 models too.
Compatible Mode Numbers l SM-G781B, SM-G781B/DS, SM-G781U, SM-G781U1, SM-G781W, SM-G7810, SM-G781N, SM-G781V, SM-G780F, SM-G780F/DSM, SM-G780G, SM-G781NK, SM-G781NK22
Tools You Need
- Heating pad / heat gun / hairdryer
- Suction cup
- Plastic card pry tools / opening picks
- Phillips PH000 screwdriver
- Adhesive (B7000 or double-sided back cover adhesive)
- Bonding clips or rubber bands (optional but recommended)
How to Find Tools and Parts
- Heating pad – https://amzn.to/3H0tHzJ
- Portable Heat Gun – https://amzn.to/4mszih1
- Clamps https://amzn.to/3GYJT4w
- STREBITO 142 Piece Repair Tool Kit https://amzn.to/3UO1jUx
- Glue | Adhesive https://amzn.to/46exVxe
- Compatible Parts https://amzn.to/4pOwJIM
- Silicone Work Repair Mat https://amzn.to/45Emz5l
👉 How to Use Tools for the Repair
Step-by-Step Camera Replacement Guide
Step 1 — Remove the SIM Tray
Power off the device completely and remove the SIM tray before opening the phone.
Step 2 — Heat the Back Cover
The back cover is strongly glued, so heat is required to soften the adhesive.
We are using a heating pad:
- Place the back cover facing down
- Select the Mobile Heating option
- Allow the heating cycle to complete
You can also use a heat gun or hairdryer. Make sure to heat evenly around all four edges.
Step 3 — Open and Remove the Back Cover
Use a suction cup to create a small gap between the back cover and frame.
Insert a plastic card pry tool and carefully cut through the adhesive around the edges.
Lift the back cover gently and place it aside.
Change Cracked Camera Lens in This Step

Step 4 — Remove the Main Board Frame & Wireless Charging Coil
Undo the nine screws holding the main board frame.
Use a pry tool to lift the wireless charging coil—slowly cut the adhesive under it.
As you raise the frame:
- Lift the frame first
- Then disconnect the wireless coil
- Finally disconnect the battery connector
Remove the full frame and pad assembly from the phone.
Step 5 — Remove the Main Logic Board
To take out the logic board:
- Remove one screw
- Disconnect the three antenna cables
- Disconnect the main flex cable
Use tweezers or a plastic pry tool to gently lift and remove the logic board.
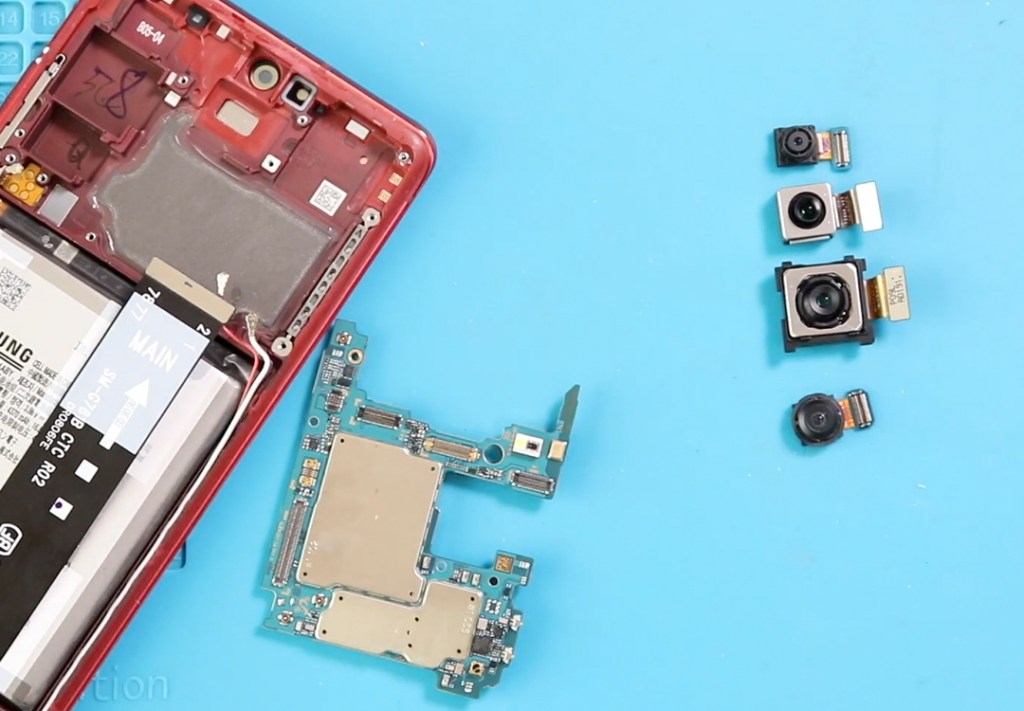
Step 6 — Identify the Cameras on S20 FE
The Samsung Galaxy S20 FE comes with:
- Three rear cameras
- Wide
- Ultra-wide
- Telephoto
- One front camera
Step 7 — Disconnect and Remove the Faulty Cameras
On the front side of the logic board:
- Disconnect the broken front camera
- Disconnect the broken wide and ultra-wide rear cameras
On the rear side of the logic board:
- Disconnect the broken telephoto camera module
Remove all faulty cameras from their positions.
Step 8 — Install the New Camera Modules
Place the new replacement cameras onto the logic board.
Ensure each module sits correctly in its slot.
Reconnect the camera flex cables securely on both sides of the board.
Step 9 — Reinstall the Logic Board
Position the logic board back into the frame.
Add the securing screw.
Reconnect the three antenna cables and the main flex cable.
Step 10 — Reassemble the Device
Reconnect the battery connector.
Place the main board frame and wireless charging coil back into the body.
Press gently on the wireless coil to ensure its connector is fully engaged.
Secure everything with the nine screws.
Step 11 — Install the Back Cover
Check the back cover adhesive.
If weak, apply B7000 glue or use a new double-sided back cover adhesive.
Place the back cover onto the phone and press firmly.
Step 12 — Apply Binding Clips
Use binding clips or rubber bands to hold the back cover tightly in place.
Leave them for a while to ensure the adhesive bonds properly.
Your Samsung Galaxy S20 FE camera replacement is now complete.
We hope you enjoyed this repair guide.
If you have any questions, feel free to ask in the comments.
Please like, share, and comment on our videos—and don’t forget to hit the Subscribe button.
Frequently Asked Questions
1. Can I replace the Samsung Galaxy S20 FE camera at home?
Yes, you can replace the S20 FE cameras at home if you have the proper tools and follow a detailed step-by-step guide. Heating the back cover and handling the logic board requires patience.
2. What tools do I need for the S20 FE camera replacement?
You will need a heating pad or heat gun, suction cup, plastic card/pry tools, Phillips screwdriver, tweezers, and B7000 or back-cover adhesive.
3. Is the S20 FE rear camera a single unit or separate modules?
The S20 FE has three separate rear camera modules:
- Wide
- Ultra-wide
- Telephoto
Each can be replaced individually.
4. How long does the camera replacement take?
For most people, it takes 20–40 minutes, depending on your experience with smartphone repairs.
5. Do replacement cameras affect picture quality?
If you purchase original OEM camera modules, the quality will be the same. Cheap non-original parts may reduce focusing accuracy or picture clarity.
6. Is the Galaxy S20 FE 4G and 5G camera the same?
Yes, most camera modules are interchangeable, but always check the seller’s compatibility list before purchasing.
Related Repair Guides