Now Reading: Samsung Galaxy S20 FE 5G Charging Port Replacement Guide | Fix Charging & Microphone Issues
-
01
Samsung Galaxy S20 FE 5G Charging Port Replacement Guide | Fix Charging & Microphone Issues
Samsung Galaxy S20 FE 5G Charging Port Replacement Guide | Fix Charging & Microphone Issues
Hi everyone, welcome back to Geardo!
Today, we will show you how to replace the Charging Port connector Flex board on the Samsung Galaxy S20 FE. Also, this guide helps to fix issues with the microphone related problems on galaxy s20 fe phone.
To start this repair, make sure you have the correct tools, which are listed in the description below.
Compatibility and Model Numbers
This repair guide based on Samsung Galaxy S20 FE 5G mobile phone, but it is also compatible with Galaxy S20 FE 4g & S20 FE 2022 models too.
Compatible Mode Numbers l SM-G781B, SM-G781B/DS, SM-G781U, SM-G781U1, SM-G781W, SM-G7810, SM-G781N, SM-G781V, SM-G780F, SM-G780F/DSM, SM-G780G, SM-G781NK, SM-G781NK22
Tools You Need
- Heating pad / heat gun / hairdryer
- Suction cup
- Plastic card pry tools / opening picks
- Phillips PH000 screwdriver
- Adhesive (B7000 or double-sided back cover adhesive)
- Bonding clips or rubber bands (optional but recommended)
How to Find Tools and Parts
- Heating pad – https://amzn.to/3H0tHzJ
- Portable Heat Gun – https://amzn.to/4mszih1
- Clamps https://amzn.to/3GYJT4w
- STREBITO 142 Piece Repair Tool Kit https://amzn.to/3UO1jUx
- Glue | Adhesive https://amzn.to/46exVxe
- Compatible Parts https://amzn.to/4pOwJIM
- Silicone Work Repair Mat https://amzn.to/45Emz5l
Importance of Using the Heating Pad
Step 1 — Remove the SIM Tray
Begin by ejecting and removing the SIM tray.
Step 2 — Back Cover Removal
To remove the back cover, gently heat around all four edges until the adhesive becomes soft.
We are using a heating pad for this repair.
Place the back cover side on the heating pad, select the Mobile Phone Heating option, and let the cycle complete.
Alternatively, you can heat the edges using a heat gun or hairdryer.
Step 3 — Separate the Back Cover
Once heated:
- Use a suction cup to create the initial gap.
- Insert a plastic card or a thin pry tool to cut the adhesive around the back cover.
- Work slowly around all edges to avoid cracks.
Remove the back cover and keep it aside.

Step 4 — Remove the Main Board Frame & Wireless Coil
Undo nine screws holding the mainboard frame and wireless charging coil.
Use a pry tool to lift the wireless coil frame. Be gentle:
- Lift the plastic frame first
- Disconnect the wireless coil plug
- Disconnect the battery connector
Remove the entire frame with the coil.
Step 5 — Open the Bottom Section (Secondary Board)
Move to the lower part of the phone.
Undo seven screws securing the secondary PCB cover.
Lift the cover using a pry tool and remove it.
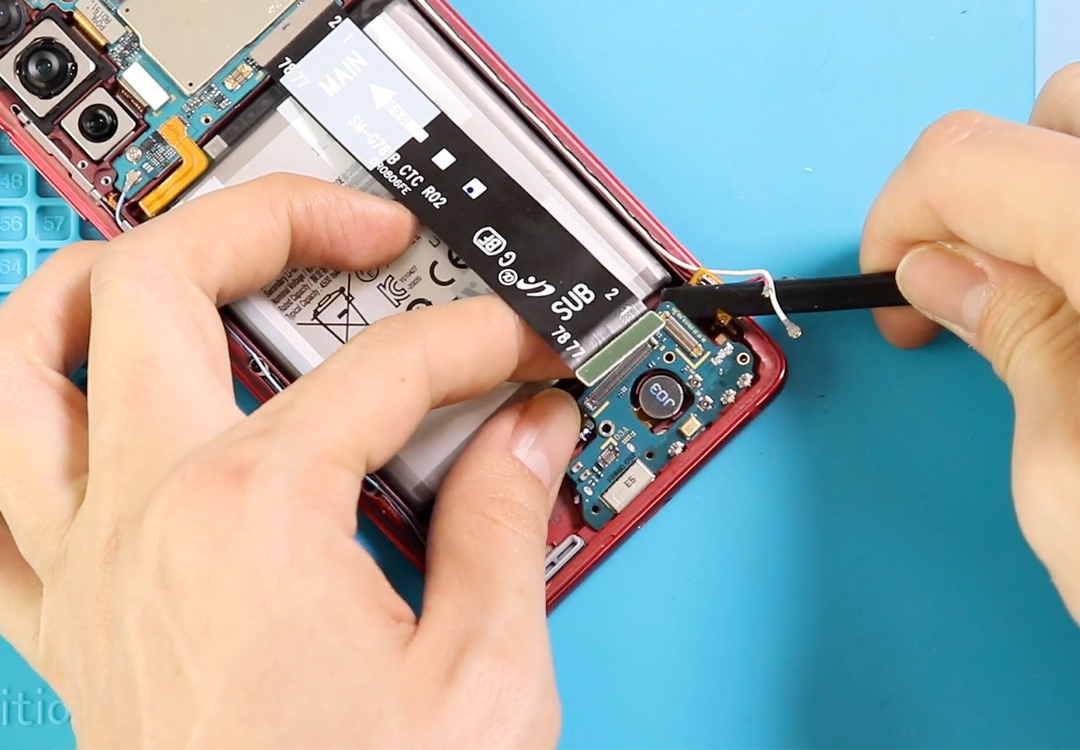
Step 6 — Disconnect All Flex Cables
On the secondary board, disconnect the following:
- Fingerprint sensor flex
- Main flex cable (bottom end)
- LCD display plug
- Two antenna cables
Next, undo the screw holding the charging port board.
Step 7 — Remove the Charging Port Board
Gently lift and remove the secondary board that includes the charging port and microphone assembly.
Fix Your Galaxy S20 Plus Charger Port – Repair Guide Inside
Step 8 — Install the New Charging Port Flex
Place the new charging port board in the same position and seat it properly on the frame.
Reconnect:
- Fingerprint sensor
- Main flex cable
- LCD connector
- Both antennas
Secure the board with its screw.

Step 9 — Reinstall the Secondary PCB Cover
Place the bottom PCB cover back and secure it with seven screws.
Step 10 — Reinstall Main Board Frame & Wireless Coil
Reconnect the battery connector first.
Place the mainboard frame with the wireless coil back in position.
Press gently to reconnect the wireless coil plug.
Secure with ten screws.
Step 11 — Reseal the Back Cover
Before installing the back cover, check the adhesive.
If it is weak:
- Apply B7000 glue, or
- Use a new double-sided back cover adhesive
Finally, attach the back cover and add bonding clips or rubber bands to apply pressure. Leave it for some time to cure.
Done!
You have successfully replaced the Charging Port Flex on the Samsung Galaxy S20 FE.
If you found this guide helpful, feel free to like, share, and comment on our videos.
And don’t forget to hit the Subscribe button!
Frequently Asked Questions
1. What problems does the Samsung Galaxy S20 FE charging port flex replacement fix?
Replacing the charging port flex usually resolves:
- Not charging or slow charging
- USB cable disconnecting
- No data transfer
- Microphone not working (mic is built into the charging board)
- Moisture detection errors
- Intermittent charging
- No sound during calls due to mic failure
2. Does the microphone work through the charging board?
Yes. The main microphone is integrated into the charging port flex board.
So if your mic is not working, callers can’t hear you, or your voice sounds muffled, replacing this board often fixes the issue completely.
3. Is this repair safe for beginners?
Yes — with patience.
The Samsung S20 FE uses clips, screws, and adhesive, so beginners can handle it as long as they heat the device properly and follow the steps carefully.
4. Will this repair affect wireless charging
No. The wireless charging coil sits on the main board frame.
Just make sure you reconnect the wireless charging pad plug properly during reassembly.
5. Do I need to disconnect the battery before removing the charging board?
Absolutely yes.
Disconnecting the battery prevents short circuits and protects the display and logic board.
Visit our site to view other repair guides for the Galaxy S20 FE 5G Series.