
Now Reading: Xiaomi Redmi Note 10 5G Fingerprint Replacement Guide | Redmi Note 10T 5G | Poco M3 Pro 5G
-
01
Xiaomi Redmi Note 10 5G Fingerprint Replacement Guide | Redmi Note 10T 5G | Poco M3 Pro 5G
Xiaomi Redmi Note 10 5G Fingerprint Replacement Guide | Redmi Note 10T 5G | Poco M3 Pro 5G
If your fingerprint sensor is not responding, failing to recognize fingerprints, or completely missing from settings, replacing the fingerprint sensor flex cable can restore biometric functionality.
This step-by-step DIY repair guide walks you through safely replacing the fingerprint sensor module on your device. The procedure is similar across related models, but this guide focuses specifically on the Redmi Note 10 5G variant.
Fingerprint issues are usually caused by:
- Physical damage after a drop
- Flex cable tear or loose connection
- Water exposure
- Sensor not detected in system settings
Replacing the fingerprint module is a moderate repair that does not require soldering.
🔧 Repair Overview
Device Type: Smartphone
Repair Type: Fingerprint Sensor Flex Cable Replacement
⭐ Repair Difficulty: ⭐⭐⭐⭐⭐☆☆☆☆☆ (5/10 – Moderate)
⏱ Estimated Repair Time: 30 – 45 Minutes
🔍 Common Signs of Fingerprint Sensor Failure
You may need this repair if:
- Fingerprint option missing in settings
- Sensor not detecting touch
- “Fingerprint hardware not available” message
- Slow or inconsistent unlocking
- Physical damage to fingerprint area
Before You Begin
Compatibility and Model Numbers
- Xiaomi Redmi Note 10 5G
- POCO M3 Pro 5G
- Xiaomi Redmi Note 10T 5G
Model Numbers : M2103K19G, M2103K19C, M2103K19I, M2103K19Y, M2103K19PG, M2103K19PI, M2103K19PY
Tools Required
- Mobile phone heating pad or hairdryer/heat gun
- Plastic pry tool / card pry
- Suction cups
- Phillips #00/#000 screwdrivers
- Torx (T2/T3/T4) screwdrivers (Depends on the Region)
- Flathead screwdriver
- Tweezers (for connectors)
- B7000 glue or double-sided adhesive (for back cover)
- Rubber bands or bonding clips to secure the back cover
How to Find Tools and Parts
- Heating pad – https://amzn.to/3H0tHzJ
- Portable Heat Gun – https://amzn.to/4mszih1
- Clamps https://amzn.to/3GYJT4w
- STREBITO 142 Piece Repair Tool Kit https://amzn.to/3UO1jUx
- Glue | Adhesive https://amzn.to/46exVxe
- Compatible Parts –
- Battery – https://amzn.to/3ZIHCQv
- Screen – https://amzn.to/40hCF1g
- Other Parts – https://amzn.to/4rVnyq4
- Silicone Work Repair Mat https://amzn.to/45Emz5l
Protect Your Redmi Note 10 5G Series
- Best Premium Case & Protector https://amzn.to/4kMS9UI
- New Redmi Phone are in Clearance https://amzn.to/4aHSVNX
Step-by-Step Fingerprint Replacement Guide
Power Off the Device
Begin by switching off the phone completely to prevent short circuits.
Open the Back Cover
The rear panel is sealed with adhesive and must be softened before removal.
- Apply gentle heat around the edges using a heating pad or hairdryer.
- Use a suction cup to create a small gap.
- Insert a plastic card and slide carefully around the edges to separate the adhesive.
Lift the back cover slowly to avoid stressing internal cables.
Remove the Camera Lens Frame & Midframe
- Remove the screws securing the camera lens cover (4 screws).
- Lift the camera lens frame gently.
Next:
- Remove the remaining screws securing the midframe (13 screws total).
- Use a plastic pry tool to release the clips around the frame.
- Carefully lift the midframe away from the device.
Disconnect the Battery
Before touching the fingerprint connector, disconnect the battery flex cable from the motherboard.
This step prevents accidental short circuits during repair.
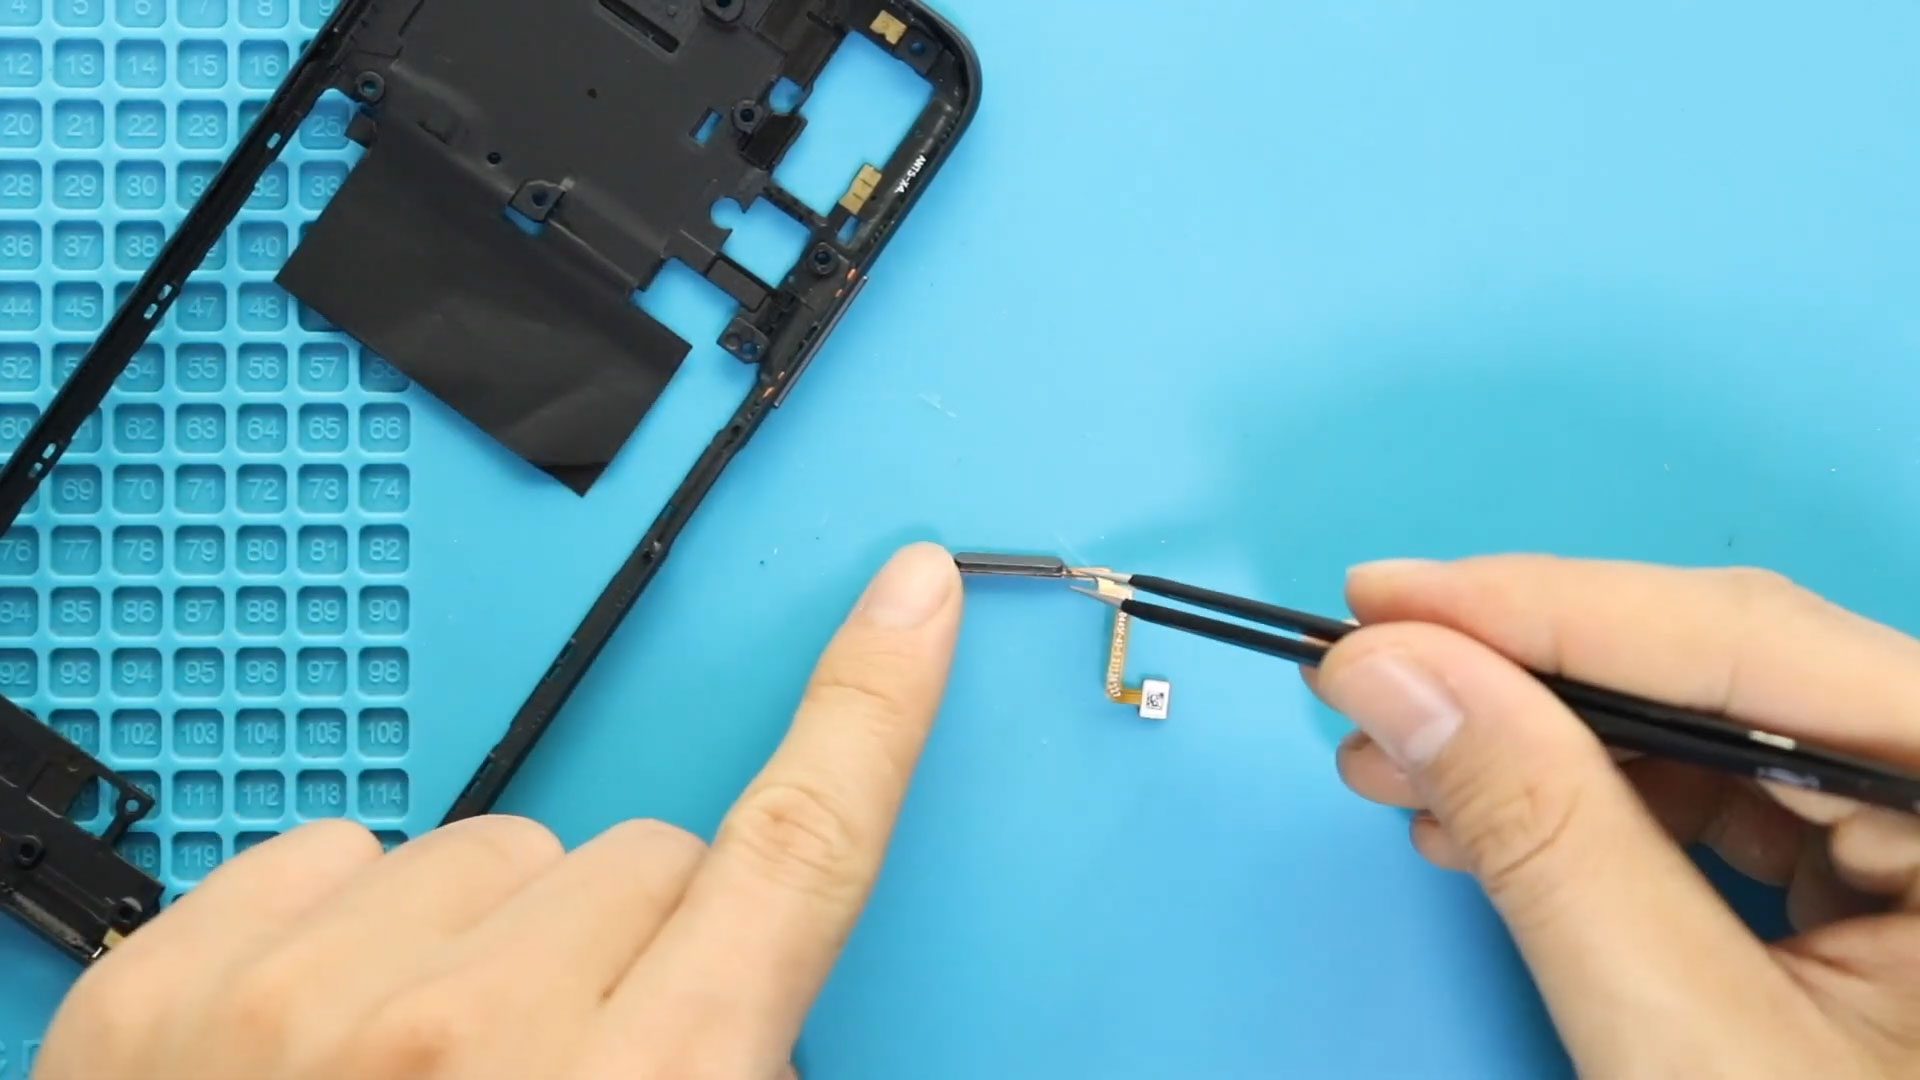
Remove the Faulty Fingerprint Sensor
- Locate the fingerprint flex cable.
- Disconnect it gently from the motherboard.
- Carefully remove the fingerprint sensor from its position.
Take your time to avoid damaging surrounding components.
Install the New Fingerprint Sensor
- Position the new fingerprint module properly.
- Connect the flex cable securely to the board.
- Ensure the cable sits flat and aligned correctly.
Do not force the connector—light pressure is enough.
Reassemble the Device
- Reconnect the battery.
- Reinstall the midframe and secure all 13 screws.
- Reinstall the camera lens frame (4 screws).
- Ensure all connectors are properly seated.
Reseal the Back Cover
- Apply new adhesive or B7000 glue if necessary.
- Align the back cover carefully with the frame.
- Use bonding clips or rubber bands to secure it.
- Leave it pressed for at least 30–60 minutes for proper sealing.
Frequently Asked Questions (FAQ)
Q1: Will replacing the fingerprint sensor delete my data?
No. This repair does not affect your personal data.
Q2: Do I need to recalibrate the fingerprint sensor?
In most cases, no calibration is required. You may need to re-register your fingerprints in settings.
Q3: My fingerprint option disappeared from settings. Will this fix it?
If the hardware is faulty or disconnected, replacing the sensor can restore the option.
Q4: Can I test before sealing the phone?
Yes. Power on the phone before sealing the back cover and test fingerprint detection.
Q5: Is soldering required?
No soldering is needed. The sensor connects via a flex cable.
Troubleshooting After Replacement
Q1: Fingerprint still not working?
- Check if the connector is fully seated.
- Restart the device.
- Re-register fingerprints.
Q2: Phone not turning on after repair?
- Confirm battery connector is secure.
- Charge the device for 15–20 minutes.
Q3: Back cover not sticking properly?
Use fresh adhesive and apply pressure with clips for at least one hour.
Q4: Fingerprint works but unlock is slow?
Delete old fingerprints and register new ones again.
Replacing the fingerprint sensor on the Xiaomi Redmi Note 10 5G is a manageable repair with proper tools and patience. Always disconnect the battery before handling internal connectors and test functionality before sealing the device.
Work carefully and keep screws organized to ensure smooth reassembly.
Related


