
Now Reading: Microsoft Surface GO 2 Memory Card Reader Replacement Guide | DIY Repair
-
01
Microsoft Surface GO 2 Memory Card Reader Replacement Guide | DIY Repair
Microsoft Surface GO 2 Memory Card Reader Replacement Guide | DIY Repair
If your Microsoft Surface Go 2 tablet is not recognizing memory cards, the memory card holder (MMC slot) may be faulty. Replacing the memory card holder restores proper functionality for expandable storage. This guide shows you how to safely remove the old memory card holder and install a new one.
Replacing the memory card holder requires careful handling of the screen assembly and internal flex cables to avoid damaging the motherboard. Follow each step carefully.
Protect Your Surface GO 2 Tablet
- Best Picked Charging Cable https://amzn.to/3J5IY2J
- Top Rated Surface Case https://amzn.to/45RA7cC
- Premium Tempered Glass https://amzn.to/4mqpEvQ
Repair Overview
Device Type: Tablet
Device Model: Microsoft Surface Go 2
Type of Repair: Memory Card Holder (MMC) Replacement
Repair Difficulty ⭐⭐⭐⭐☆ (4 / 5 — Advanced Repair)
⏱ Estimated Repair Time 90 — 120 Minutes
Reasons for Memory Card Holder Replacement
You may need to replace the memory card holder if:
- Tablet does not detect inserted memory cards
- Cards intermittently connect or disconnect
- Physical damage to the memory card slot
- Bent or broken pins in the MMC slot
Before You Begin
Compatibility and Model Numbers
- Microsoft Surface Go 2
- Microsoft Surface GO 2nd Generation
This repair guide based on Microsoft Surface Go 2 Tablet
Compatible Mode Numbers : 1901, 1926, 1927
Tools You Need
- Heating pad / heat gun / hairdryer
- Suction cup
- Plastic card pry tools / opening picks
- Phillips #000 / #00 screwdriver
- Torx T3, T4, T5 Screwdriver
- Tri-Point Y0 / Y000 Screwdriver – Occasionally for specialized internal screws.
- Adhesive (B7000 or double-sided frame adhesive)
- Bonding clips or rubber bands (optional but recommended)
How to Find Tools and Parts
- Heating pad – https://amzn.to/3H0tHzJ
- Portable Heat Gun – https://amzn.to/4mszih1
- Clamps https://amzn.to/3GYJT4w
- STREBITO 142 Piece Repair Tool Kit https://amzn.to/3UO1jUx
- Glue | Adhesive https://amzn.to/46exVxe
- Compatible Parts –
- Battery – https://amzn.to/41Xg6QE
- Screen – ttps://amzn.to/41m85EM
- Other Parts – https://amzn.to/4oXYoGW
- Silicone Work Repair Mat https://amzn.to/45Emz5l
Using proper tools reduces the risk of damaging the phone.
Step-by-Step Microsoft Surface Go 2 Memory Card Holder Replacement
Step 1 — Prepare the Device
- Remove the SIM tray if your tablet has cellular connectivity.
- Power off the tablet completely.
Step 2 — Heat the Front Display
Proper heating is essential for safe screen removal:
- Place the tablet front side down on a heating pad designed for tablets.
- Select the tablet heating option and wait until the heating completes.
- Alternatively, use a heat gun or hair dryer to soften adhesive around the edges.
Step 3 — Lift the Screen
- Attach a suction cup near the edge of the display and lift slightly.
- Insert a plastic pry card or triangle pick between the frame and display.
- Carefully cut through the adhesive around the screen.
⚠️ Be gentle — flex cables remain attached to the motherboard.
Step 4 — Disconnect Battery Connector
- Lift the screen and place it on your table.
- Remove the two screws securing the battery connector.
- Disconnect the battery to prevent electrical short circuits.
Step 5 — Remove LCD Assembly
- Flip the LCD screen assembly carefully.
- Remove the connector bracket.
- Lift the LCD connector lever and disconnect the cable.
- Now the screen assembly can be separated from the tablet body.
Step 6 — Clean Frame Edges
- Remove leftover adhesive and debris to prepare for the new memory card holder installation.
Step 7 — Remove the Old Memory Card Holder
- Take out the bottom-right bracket.
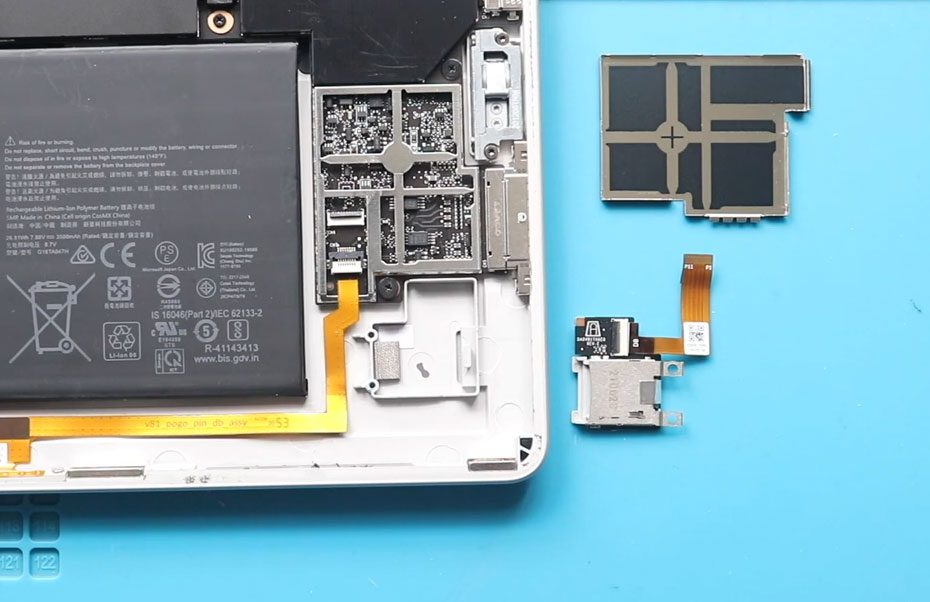
- Lift the lever and gently pull out the memory card flex cable.
- Unscrew the two screws securing the memory card holder.
- Carefully pry out the faulty MMC holder from the tablet body.
- If necessary, fully remove the flex cable by lifting the lever.
Step 8 — Install the New Memory Card Holder
- Place the new memory card holder onto the tablet body.
- Secure it with the two screws.
- Reinsert the flex cable and secure the lever.
- Reinstall the bracket.
Step 9 — Reconnect Screen and Battery
- Reconnect the LCD screen connector and secure the bracket.
- Reconnect the battery connector and tighten the two screws.
Step 10 — Test the Device
- Power on the tablet and test:
- Screen display
- Touch functionality
- Memory card detection
Testing now prevents having to reopen the device later.
Step 11 — Seal the Screen
- Apply new adhesive or glue along the edges.
- Slide the screen from bottom to top.
- Press gently along all edges.
- Add rubber bands or binding clips around the frame.
- Leave it for sufficient time to cure.
- Remove clips once adhesive has set.
Frequently Asked Questions (FAQ)
Q1. Can I replace the memory card holder without removing the screen?
No. The memory card holder is located beneath the screen assembly and requires full screen removal.
Q2. What if the flex cable is damaged?
A damaged cable will prevent the memory card from functioning. Replace the cable along with the memory card holder if necessary.
Q3. Do I need special adhesive?
Yes. Proper adhesive ensures the screen stays securely attached and prevents dust or moisture ingress.
Q4. How long does this repair usually take?
Expect about 90–120 minutes depending on experience and caution during flex cable handling.
Q5. Can I reuse the old memory card holder if it looks fine?
Only if it is fully functional. Faulty or intermittently working holders should be replaced.
Troubleshooting After Memory Card Holder Replacement
Q1. Tablet not recognizing memory cards
Ensure the flex cable is correctly inserted and the lever is fully secured.
Q2. Memory card intermittently disconnects
Check that the memory card holder is properly seated and screws are tight.
Q3. Screen or touch not working after repair
Verify that the LCD connector is properly seated and battery connector is secured.
Q4. Screen lifting after reassembly
Adhesive may not have cured properly. Reapply adhesive and use clips to secure until fully bonded.
Related Guides













